Shared File System in OpenStack on Destination Earth
What we are going to cover
Prerequisites
No. 1 Account
You need a DESP OpenID hosting account with access to the Horizon interface:
Technology behind SFS
SFS in OpenStack is provided by a dedicated module known by its project name Manila. It allows users to provision and manage file shares (e.g., NFS or SMB) as a service.
Key features of OpenStack SFS/Manila include:
Provisioning: Ability to create, delete, and modify shared file systems on-demand.
Access Control: Manage which instances or users have access to the file shares.
Snapshots: Support for creating and managing snapshots of file systems.
Multi-tenancy: Ensures that different tenants can safely consume and isolate shared file systems.
Backend Support: Capability to work with various types of storage backends for flexibility and scalability.
Overall, Manila adds an important dimension to the storage capabilities within OpenStack, complementing block storage (Cinder) and object storage (Swift) to provide a comprehensive suite of storage services.
Details of SFS implementation at DEDL
NVME storage in backend.
Single sfs network for all tenants and projects.
All instances using shares must be attached to this common sfs network.
Access to share is defined by IP address of instance.
NFS (Network File System) only protocol is currently available.
The important implication and feature
Since all shares and instances are in the same network, the SFS shares may be used to simply share data between OpenStack projects or even tenants. Thanks to this you may:
Build environments based on multiple projects in the same region.
Use share as a more elastic solution for migration between projects than transferring volumes.
Cooperate and share data with other organizations using CloudFerro Cloud / CREODIAS in the same region.
Permissions
To use the SFS solution, the user must have the appropriate permissions. The primary role that allows creating and managing shares is the manila_user role, which must be assigned to the user by administrator per project. Without this role, the Shares option will not be available in the Horizon menu, nor will any actions be executable via the API.
Here is how to verify whether you can use SFS:
OpenStack GUI Horizon
select the project and
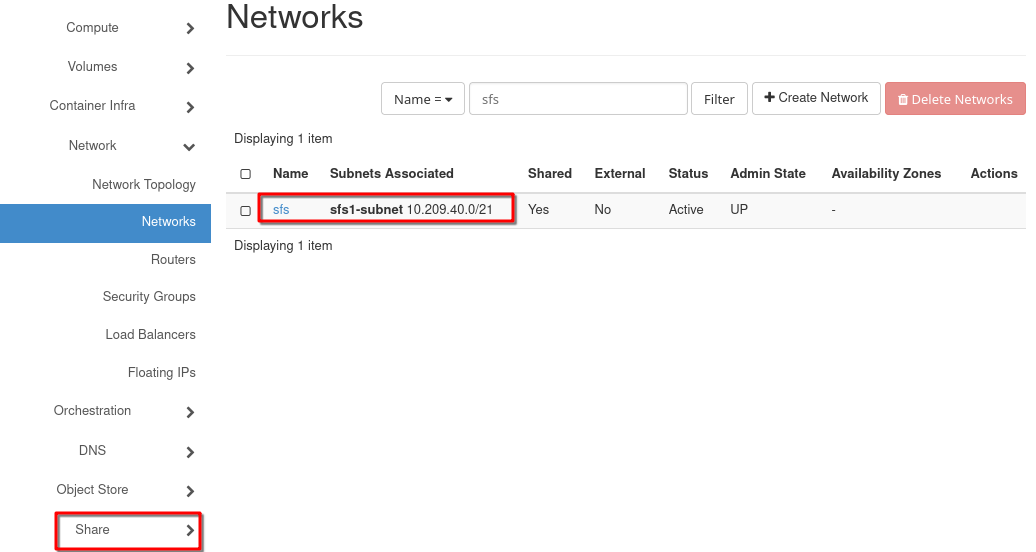
click on Network -> Networks.
Review the list. Besides the other networks, you should see sfs network with sfs1-subnet.
Additionally, in the left side menu you should see the section Share.
Steps to create and access share:
Select instances that should access the share.
Go to the list of instances. In Horizon GUI Compute -> Instances
For each of them select from the context menu Attach Interface
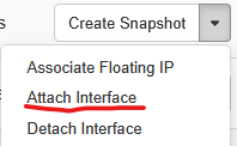
Leave the way of specifying Interface as by Network (and IP address) and select sfs network
Leave Fixed IP Address empty. The address would automatically be assigned by DHCP.
Note IP addresses assigned to instances in sfs network.
Click on button Attach Interface and a note with green background will appear in the right upper corner of the Horizon windows, stating that the interface is created.
Create a share.
Go to Horizon to Share -> Shares.
Click + Create Share button.
In window:
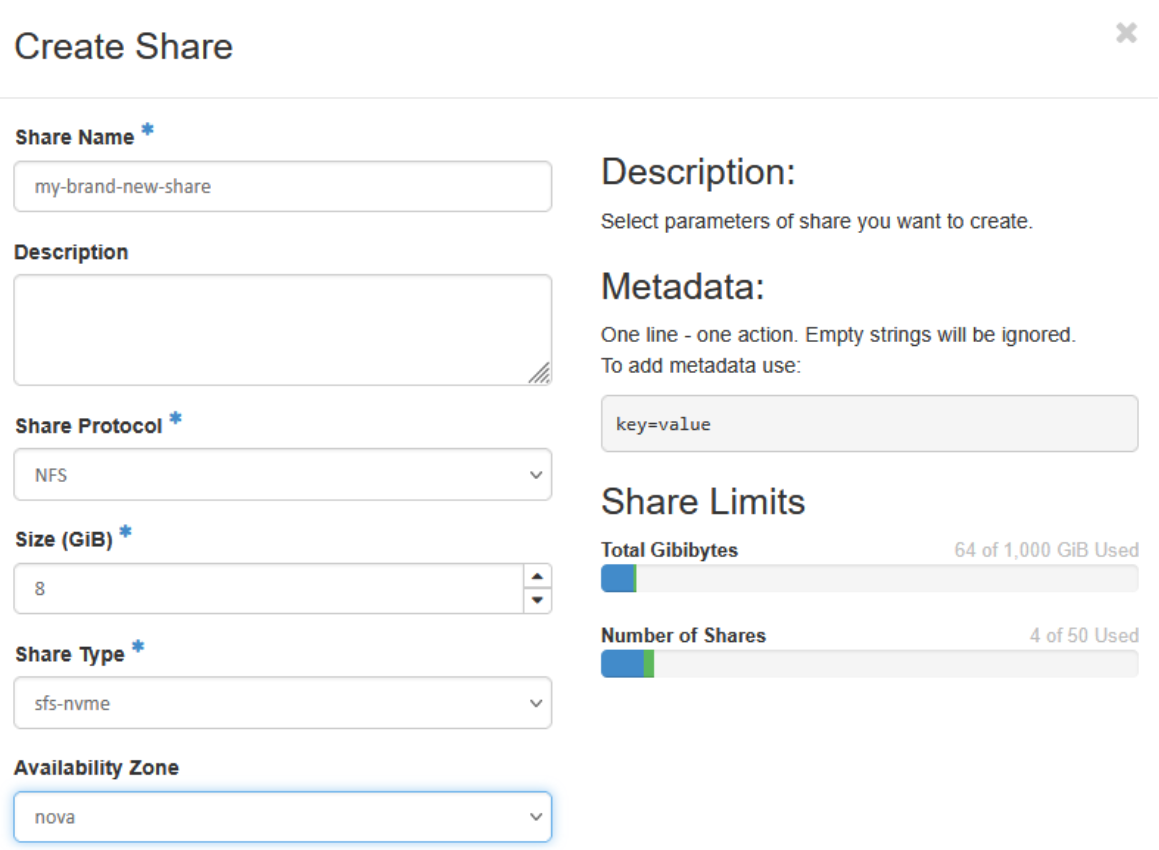
You must fill:
Share Name
Share Protocol (remember that default option NFS is only supported)
Size
Availability Zone
Then press button Create.
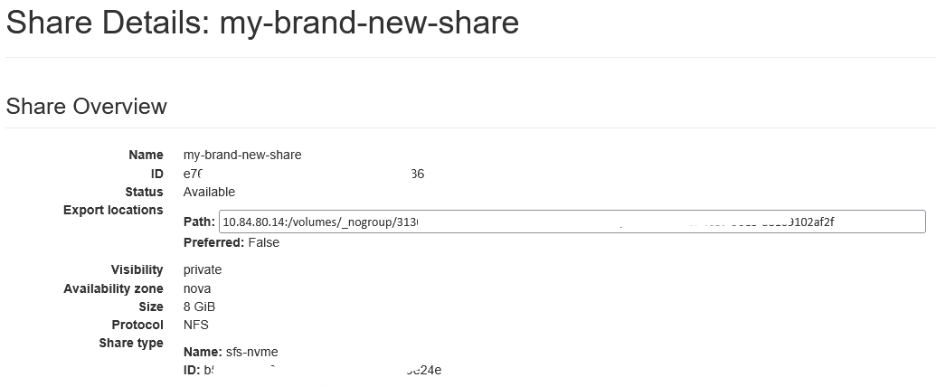
When a new share appears on the list, click its name and note the path:
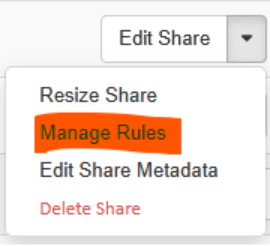
Return to shares list and select from share context menu Manage Rules
Click + Add rule button
On popup window:
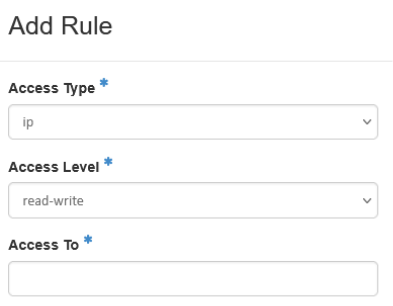
Leave Access type as ip
Select Access Level from read-only or read-write.
Insert IP address in sfs network noted before for instance with mask 32 with format xx.xx.xx.xx/32.
Repeat + Add Rule for all other addresses noted.
IMPORTANT NOTE:
As this is the only way of granting/restricting access, we strongly recommend to always use a single instance IP address with mask 32 meaning only single address, despite the fact that wider network class with lower mask may be entered here.