How to use affinity and anti affinity OpenStack
When you create one virtual machine on OpenStack platform, you specify its input parameters and let OpenStack create it in the cloud. Within a minute or two, the new virtual machine will be spawned and available for further usage. Under the hood, OpenStack divides cloud into so-called Compute nodes, which are servers using hypervisor software to provide CPU, storage, network, and memory resources for the VM.
The simplest case is to ask for one new VM. In response, OpenStack will create exactly one new VM, on a Compute node of its own choice. In this article, however, we will explain what is going to happen when the requirement is to place several VMs onto two or more Compute nodes.
Maybe you have developed one VM with the application code, while the other VM is to serve as a database. If you want those VMs to communicate very fast, you may require that they both must be on the same Compute node. Conversely, if security is your main concern, you may require that the two VMs be on two different nodes – if one fails, the other should still be intact.
Basic notions of affinity and anti-affinity
There are four possibilities of positioning two or more VMs and here is how they are called:
- affinity
all VMs on the same node
- anti affinity
each VM on a different node
- soft affinity
VMs on the same host if possible
- soft andi-affinity
VMs on separate hosts if possible
What We Are Going To Cover
Basic notions of affinity and anti-affinity policies
Creation of Kubernetes cluster as an example of using affinity policies
Creation of server groups with affinity rules
Creation of multiple instances with one set of affinity rules
Verifying that the affinity policies have been properly implemented
Prerequisites
No. 1 Hosting
You need a Destination Earth hosting account with Horizon interface https://cloud.central.data.destination-earth.eu.
In this article, you will create 20 different virtual machines. If you do not plan to use them seriously, delete them afterwards in order to cut down the costs of using the cloud.
No. 2 How to create a new VM
A general introduction to creating a virtual machine on the Destination Earth cloud is described in the following article: How to create new Linux VM in OpenStack Dashboard Horizon.
In particular, you will enter number 5 into field Count in window Details when launching a new VM.

No. 3 openstack command operational
To communicate to OpenStack, the openstack command must be active. See How To Install OpenStack and Magnum Clients for Command Line Interface to Destination Earth Horizon.
Also How To Use Command Line Interface for Kubernetes Clusters OpenStack Magnum.
Example of affinity in Kubernetes clusters
A good example of affinity in real life situations is creation of Kubernetes cluster cloud. Kubernetes cluster contains two groups of nodes:
- master nodes
They organize the cluster, holding the instructions for worker nodes. In order to minimize the probability of all of them failing at the same time, they need to be as independent as possible. Therefore, their affinity policy is Anti Affinity, meaning they will all be on different Compute nodes.
- worker nodes
They contain the actual code of the application and should be on separate hosts if possible (but not necessarily so). A suitable affinity policy for them is Soft Anti Affinity.
Here is the simplest possible cluster, with one master node and one server node.
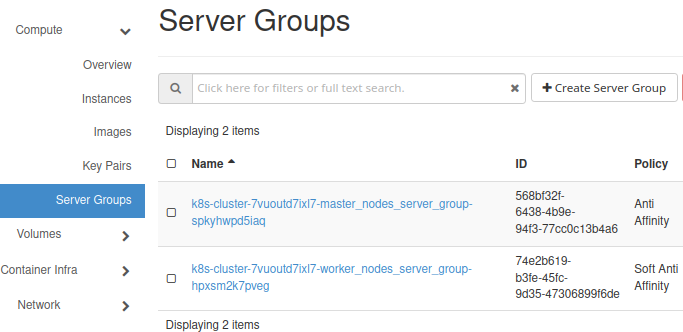
Their respective affinity policies, Anti Affinity and Soft Anti Affinity are in column Policy.
In real-life situations, there would be at least three master nodes on three separate Compute nodes with dozens (or hundreds, or even thousands) of worker nodes, depending on the application. The affinity policies will stay the same, though, regardless of the number of nodes:
master nodes must be on different hosts while
worker nodes should be on different hosts, if possible.
Affinity rules for Server groups
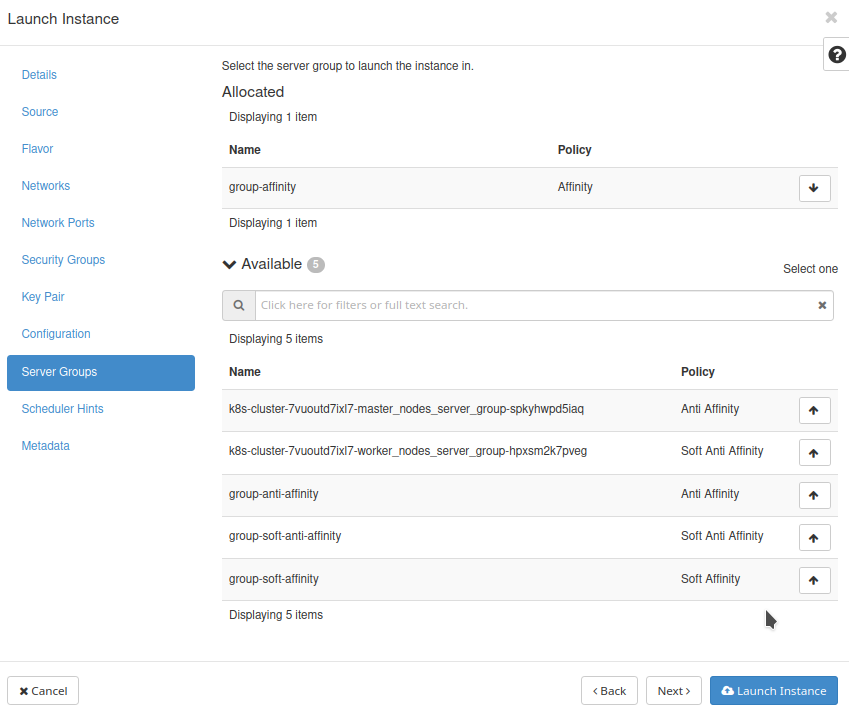
OpenStack enables creation of new VMs using all these four variations of affinity, through the notion of Server groups. From the main Horizon menu, execute Compute –> Server Groups and enter name and the type of affinity.
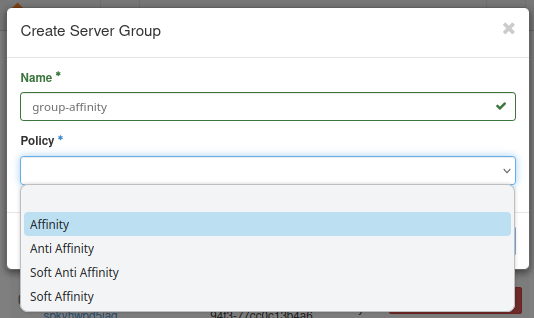
Let us now create groups of virtual machines for each of these four cases.
Affinity
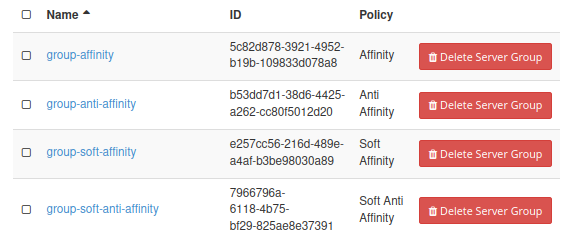
Create a set of 5 new virtual machines, using group affinity:
We used Ubuntu 22.04 LTS image and eo2a.medium flavors as they are requiring smaller amount of resources.
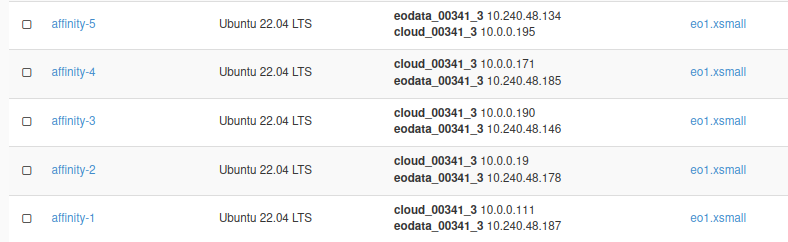
Proceed to create other three groups of machines, each with a batch of 5 instances, using Anti Affinity, Soft Affinity and Soft Anti Affinity, respectively. The names of the groups of VMs are affinity-x, anti-affinity-x, soft affinity-x and soft anti affinity-x, where x is the ordinal number of an instance within a group.
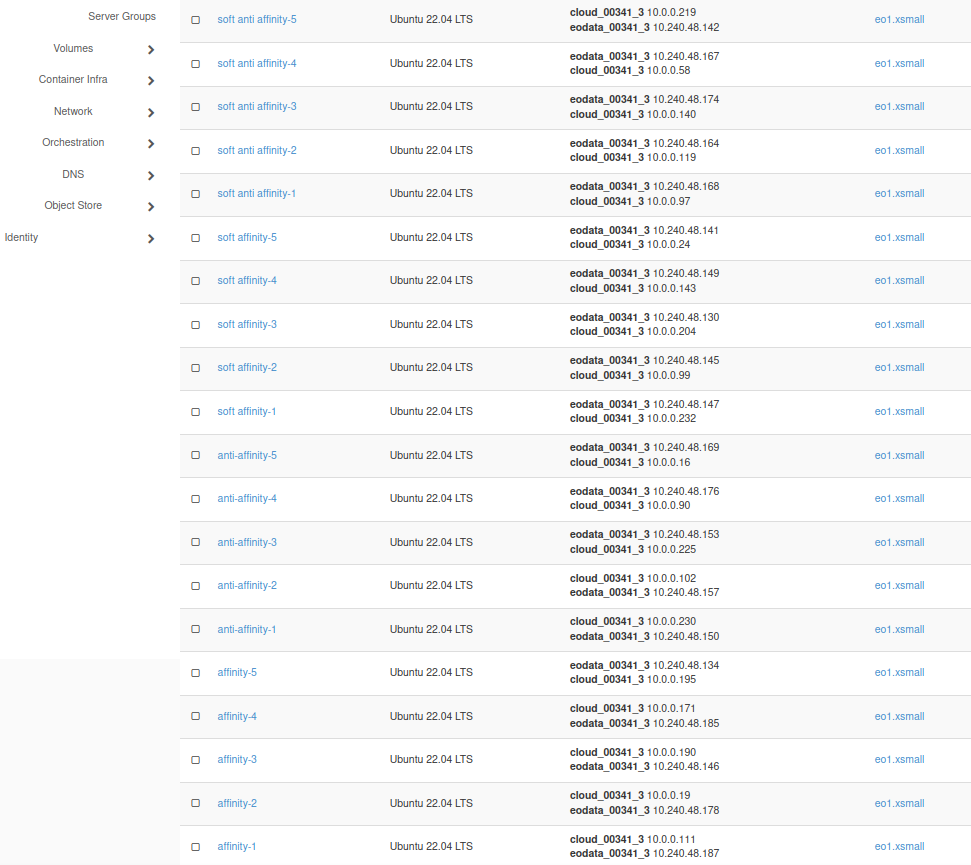
The final result, in Compute -> Instances menu would look like this:
How to prove that affinity policies work
To verify that the affinity policies were implemented properly, you need to list the hostId parameter of each server. CLI interface works here the best. If you have consumed Prerequisite No. 3, you will have the openstack command operational for the cloud you are working with. The command to list servers, in its simplest form is
openstack server list
but using it in that way would list too many parameters. We are only interested in two facts: the ID of the server and its name. Names we used when creating the server group will tell us what kind of affinity policy was used. Execute the following command in terminal:
openstack server list -f table -c ID -c Name
The result will look like this:
+--------------------------------------+-----------------------------------+
| ID                                   | Name                              |
+--------------------------------------+-----------------------------------+
| 25b10129-c476-40f0-9eeb-81ef64b45fd3 | soft anti affinity-1              |
| 774c9d55-17e1-428c-886f-9484b421f84d | soft anti affinity-3              |
| aa1da6ad-94b6-4d35-a40e-28444cc8a30e | soft anti affinity-5              |
| c584997b-07b0-4365-94ef-433890df3cf2 | soft anti affinity-4              |
| ce3cd620-0237-4c2e-b9bf-3ae96ab09bca | soft anti affinity-2              |
| 55cf9522-9449-4430-afaf-3d268e297831 | soft affinity-3                   |
| 72b93121-446d-4662-854c-19df2277070a | soft affinity-5                   |
| c0481477-84e3-4e9c-b876-dc61e9657811 | soft affinity-4                   |
| d0fa2285-5942-43d7-8527-6646e3f34a24 | soft affinity-1                   |
| dd28c520-4f9d-4205-9cca-c25dbedf859c | soft affinity-2                   |
| 44e98c5e-4637-4fb9-8001-d8f8b7df1737 | anti affinity-2                   |
| 6ac7aebe-2e1e-4e43-ab4c-f504f668ca93 | anti affinity-4                   |
| bbc72e1c-e5ed-4b29-9adf-c609ef518b82 | anti affinity-3                   |
| ccd533c7-f2d7-4264-8458-c14ac2b99430 | anti affinity-5                   |
| efcc55a7-e731-4e3c-ba82-2be16625f15c | anti affinity-1                   |
| 01af99fc-0838-41d2-a1d2-a3ca1d99804a | affinity-5                        |
| 09078a0c-9ea2-4440-a02e-f14e3634a523 | affinity-1                        |
| 0e32c2de-87b1-4b55-b672-a8c18d9aa989 | affinity-4                        |
| 6a596502-97f4-49c0-be54-c5cdb3a76aa4 | affinity-3                        |
| e1bd88f1-1637-4333-91ab-9c940cfaf04a | affinity-2                        |
| e81dfd82-64ec-4219-9bda-bfd39e802933 | k8s-cluster-kyvvjxydybm6-node-0   |
| 04b4b7ca-c279-46eb-848c-6d5ece0bec32 | k8s-cluster-kyvvjxydybm6-master-1 |
| 234ce6a8-c2bf-4410-8bc7-3386a8fa7d37 | k8s-cluster-kyvvjxydybm6-master-0 |
+--------------------------------------+-----------------------------------+
In the left column is an array of server IDs but we need to probe further and get another parameter of the server, hostId. By way of example, use this command:
openstack server show 234ce6a8-c2bf-4410-8bc7-3386a8fa7d37 -c hostId -f json | jq -r '.hostId'
where 234ce6a8-c2bf-4410-8bc7-3386a8fa7d37 is one of the ID strings from the table above. The result is
0e8bfd5261acc7348df0df4a54bb3a358b4842a9e45398eab1c6979c
This is the hostId that we are looking for.
Automating the process
The next task is to repeat the process for all 20 instances. Here is the code that will read server IDs into an array and print relevant hostId values. Create file affinity.sh with command
sudo nano affinitty.sh
and enter the following code into it:
#!/bin/bash

# Define affinity pattern array
pattern=("affinity" "anti affinity" "soft affinity" "soft anti affinity")

# Loop through each pattern
for current_pattern in "${pattern[@]}"; do
    # Your command that produces multiple lines of output
    query_output=$(openstack server list -f value -c ID -c Name | grep "$current_pattern")

    # Initialize variables
    declare -a lines_array=()

    # Loop through each line,
    # extract the first and second strings, and
    # add them to the array if the second string is the current pattern
    while IFS= read -r line; do
        first_string=$(echo "$line" | awk '{print $1}')
        second_string=$(echo "$line" | cut -d' ' -f2-)
        trimmed_second_string=$(echo "$second_string" | sed 's/ *$//' | sed 's/\(.*\)-.*/\1/')
        if [ "$trimmed_second_string" == "$current_pattern" ]; then
            lines_array+=("$first_string")
        fi
    done <<< "$query_output"

    # Display just the current pattern
    echo "$current_pattern:"
    for element in "${lines_array[@]}"; do
        # Use each element as an argument for openstack server show and extract hostId using jq
        openstack server show $element -c hostId -f json | jq -r '.hostId'
    done
done
Make the file executable:
sudo chmod +x affinity.sh
Execute it like this:
./affinity.sh
The result consists of four groups of hostId parameters, for each type of affinity policy:
affinity:
88e0412e1ce4c500f38a783a40cb7eca6f57b3d7ca5e06fa8d30e5f8
88e0412e1ce4c500f38a783a40cb7eca6f57b3d7ca5e06fa8d30e5f8
88e0412e1ce4c500f38a783a40cb7eca6f57b3d7ca5e06fa8d30e5f8
88e0412e1ce4c500f38a783a40cb7eca6f57b3d7ca5e06fa8d30e5f8
88e0412e1ce4c500f38a783a40cb7eca6f57b3d7ca5e06fa8d30e5f8
anti affinity:
88e0412e1ce4c500f38a783a40cb7eca6f57b3d7ca5e06fa8d30e5f8
55c269f1e948f4910038218c53b15880bd558ce266b83f9d3f6e297d
1ca4c1ae4b82dacf810cf388a132bd36b447af8f185e2a3dff025572
370c4b8aafe009153bb8819728a42e57cf65b54dc1badacc4ed41916
0e8bfd5261acc7348df0df4a54bb3a358b4842a9e45398eab1c6979c
soft affinity:
88e0412e1ce4c500f38a783a40cb7eca6f57b3d7ca5e06fa8d30e5f8
370c4b8aafe009153bb8819728a42e57cf65b54dc1badacc4ed41916
88e0412e1ce4c500f38a783a40cb7eca6f57b3d7ca5e06fa8d30e5f8
88e0412e1ce4c500f38a783a40cb7eca6f57b3d7ca5e06fa8d30e5f8
370c4b8aafe009153bb8819728a42e57cf65b54dc1badacc4ed41916
soft anti affinity:
370c4b8aafe009153bb8819728a42e57cf65b54dc1badacc4ed41916
1ca4c1ae4b82dacf810cf388a132bd36b447af8f185e2a3dff025572
0e8bfd5261acc7348df0df4a54bb3a358b4842a9e45398eab1c6979c
55c269f1e948f4910038218c53b15880bd558ce266b83f9d3f6e297d
88e0412e1ce4c500f38a783a40cb7eca6f57b3d7ca5e06fa8d30e5f8
Conclusion
The basic affinity policy worked. For affinity, all hosts have the same hostId, 88e0412e1ce4c500f38a783a40cb7eca6f57b3d7ca5e06fa8d30e5f8, meaning, all instances with group type affinity are placed on one and the same host.
See the same data as above but with the hostId singled out in green:
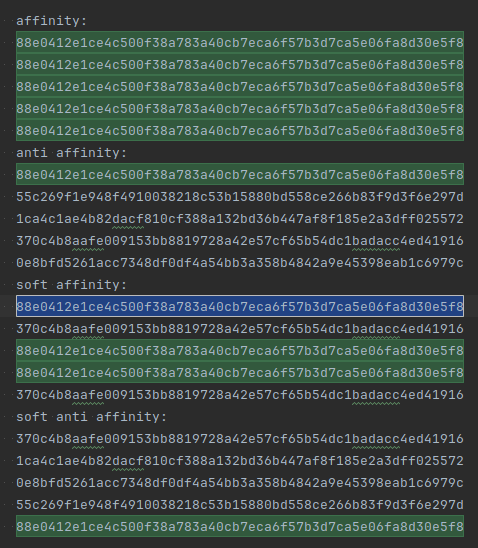
Anti affinity also works as all hostId parameters under anti_affinity are different.
Soft affinity uses the same hostID as for affinity in three places, but the other two are not identical. It managed to put the majority of instances on the same compute node, but “not quite”.
Finally, in this example, soft anti affinity is the same as anti affinity, except that the order of instances is different.
Note that some of the hosts are identical across the four groups, but within each group, the policies are implemented coherently.