How to create a VM using the OpenStack CLI client cloud
This article will cover creating a virtual machine CENTRAL cloud using the OpenStack CLI client only. It contains basic information you need to get started.
What We Are Going To Cover
Gathering information which will be used to create a virtual machine
Creating a virtual machine
Creating a floating ip for the new machine
Accessing it via SSH
Prerequisites
No. 1 Account
You need a Destination Earth hosting account with access to the Horizon interface: https://cloud.central.data.destination-earth.eu.
No. 2 OpenStack CLI client configured
You need to have the OpenStack CLI client configured and operational. See How to install OpenStackClient for Linux.
You can test whether your OpenStack CLI is properly activated by executing the openstack server list command, which should return the list of your virtual machines.
No. 3 Uploaded public SSH key
YOu should always attach an SSH key while creating your virtual machine. If there isn’t one already, you can create it or upload to the Destination Earth cloud.
Always use the latest value of image id
From time to time, the default images of operating systems in the Destination Earth cloud are upgraded to the new versions. As a consequence, their image id will change. Let’s say that the image id for Ubuntu 20.04 LTS was 574fe1db-8099-4db4-a543-9e89526d20ae at the time of writing of this article. While working through the article, you would normally take the current value of image id, and would use it to replace 574fe1db-8099-4db4-a543-9e89526d20ae throughout the text.
Now, suppose you wanted to automate processes under OpenStack, perhaps using Heat, Terraform, Ansible or any other tool for OpenStack automation; if you use the value of 574fe1db-8099-4db4-a543-9e89526d20ae for image id, it would remain hardcoded and once this value gets changed during the upgrade, the automated process may stop to execute.
Warning
Make sure that your automation code is using the current value of an OS image id, not the hardcoded one.
Step 1: Gather information which will be used to create your virtual machine
Choose an image
In this article we will use an image as a source for your virtual machine. It can be one of the following:
Default images CENTRAL cloud
Images which were shared with you from other projects and which you accepted
Images you uploaded yourself, for example, by following this article: How to upload your custom image using OpenStack CLI
Other sources are outside of scope of this article.
You can execute the following command to see those images:
openstack image list
You should get the output like this:
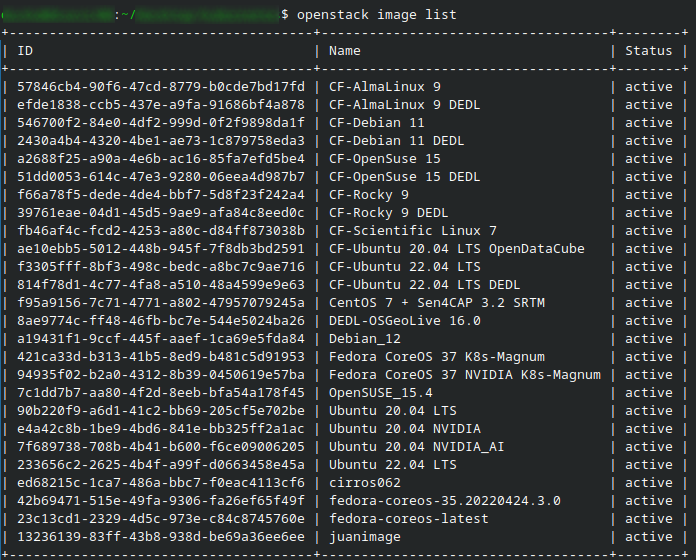
In this example, we can see the default images available on the cloud. If you have previously uploaded another, non-standard, image, it would show here as well.
While creating your virtual machine using the openstack server create command, you will pass the name or ID of the image of your choice using the --image parameter.
Flavor
Flavors determine hardware available to the virtual machine. You can list flavors available to you using this command:
openstack flavor list
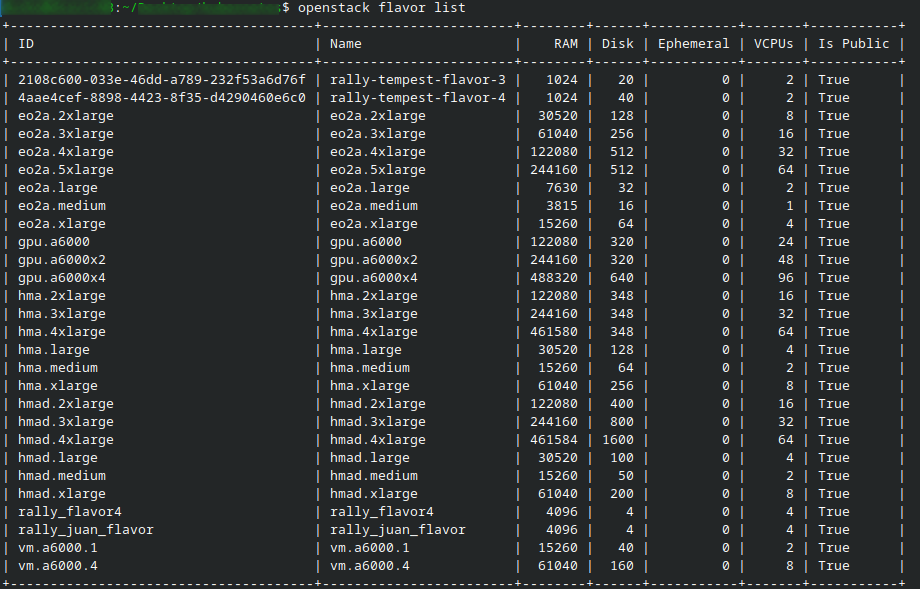
While creating your virtual machine using the openstack server create command, you will pass the ID or name of the flavor you chose using the --image parameter.
Please note that the following flavors contain access to NVIDIA GPU:
vm.a6000.1
vm.a6000.4
They should only be used with default images CENTRAL cloud which contain the phrase NVIDIA in their name. These images contain software specifically designed for those flavors.
Key Pair
Many images will apply the public SSH key provided during VM creation. In case of some images, it is the only way of accessing a virtual machine. In the OpenStack CLI client you can list key pairs available to you using this command:
openstack keypair list
While creating your virtual machine using the openstack server create command, you will pass the ID or name of the key pair you chose using the --key-name parameter.
Networks
To list networks which can be connected to your virtual machine, execute the following command:
openstack network list -c ID -c Name
You may a result similar to this:

Two of these four networks are the default ones: vip-external and external. You should not use them in CLI commands to create a new VM.
You should always use your default networks, which will start with cloud_. It will also contain access to EODATA so there is no need for special networks for only that.
While creating your virtual machine using the openstack image create command, you will pass the ID or name of the networks you chose using the --network parameter.
To add a new network, use separate --network parameter. For instance, if you want to connect your virtual machine to networks called, say, network1 and network2, you can do it by adding the following to openstack server create command:
--network network1 --network network2
Security groups
Security groups block or allow different types of Internet traffic on your virtual machine. To list security groups available to you, execute the following command:
openstack security group list
You will pass the security groups using the --security-group parameter. If you want to add multiple security groups, you can do it in a similar way as in the case of networks (mentioned above). For instance, if we want to add the security groups called group1 and group2, you will need to add the following to openstack server create command:
--security-group group1 --security-group group2
Step 2: Create a virtual machine
Execute the openstack server create command. Add parameters based on choices you made in Step 1. Finish the command with the name of your choice for your virtual machine.
Example
Let us use one of the default images, let’s say, CF-Debian 11 DEDL. We want to create a virtual machine with the following specifications:
Name: Test-Debian
Flavor: eo2a.xlarge
Source: CF-Debian 11 DEDL
Key Pair: sshkey previously uploaded to your account
Security groups: default and allow_ping_ssh_icmp_rdp
Networks: cloud_dusko_1
These parameters will be different in your case, but here let us use them as stated:
openstack server create \
--image "CF-Debian 11 DEDL" \
--flavor eo2a.xlarge \
--key-name sshkey \
--network cloud_dusko_1 \
--security-group default \
--security-group allow_ping_ssh_rdp \
Test-Debian
If you entered the command correctly, you should see the output containing the information about your VM, for example:
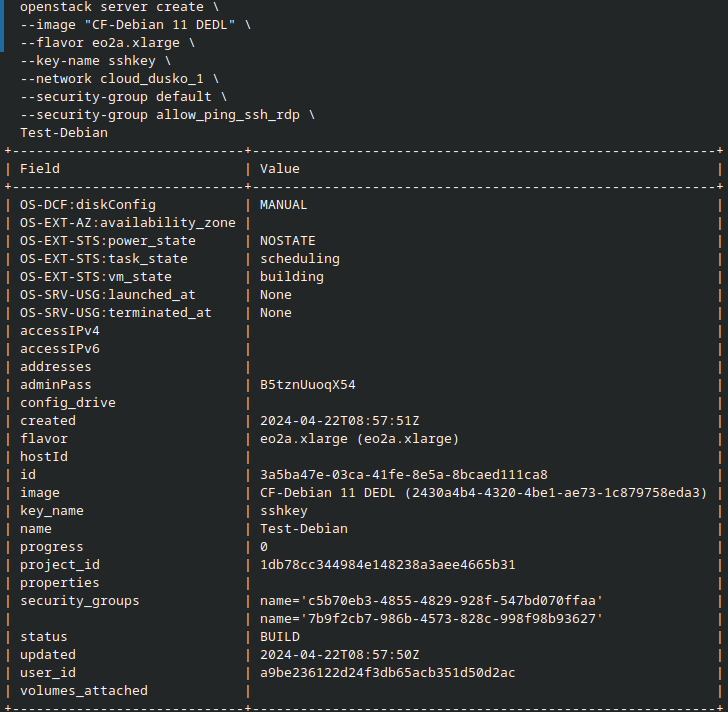
The OS-EXT-STS:vm_state will probably show building which means that the VM is being deployed. To check the current status of your VM, copy the ID of your VM from the field ID. After that, execute the command below. Replace 3a5ba47e-03ca-41fe-8e5a-8bcaed111ca8 with the ID of your VM.
openstack server show 3a5ba47e-03ca-41fe-8e5a-8bcaed111ca8 -c name -c power_state
Typically after up to a minute, the command above should show the output is 1 in the field power_state:
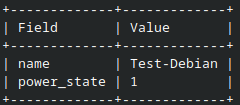
This means that your virtual machine should be operational.
How to access the VM from the Internet
To access the virtual machine from the Internet, it needs a floating IP assigned to it. You can check the list of Floating IPs available in your project by executing this command:
openstack floating ip list
If the output is empty, it means that the project does not have any floating ip address yet. In general, that list will be empty only at very beginning of using the account.
To assign a floating IP to your project, execute the following command. In it, external is the name of the default external network used in your project.
openstack floating ip create external
The output of this command should give information about the created floating IP, for example:
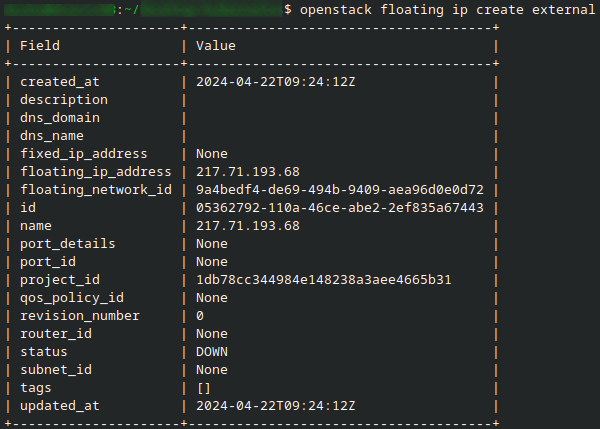
You should now assign the newly created floating IP to your virtual machine. Execute the following command and replace 217.71.193.68 with the IP address you could find in the output of the previous command in the field floating_ip_address.
openstack server add floating ip Test-Debian 217.71.193.68
If this command is executed successfully, it should not give any output. You can check the assignment by executing the following command:
openstack server list

The row with information about your virtual machine should contain both
the local IP address (in this example, it is 10.0.0.218) and
the floating IP (in this example, it is 217.71.193.68).
You can now connect to your new VM via SSH to execute commands. In the case of the default Debian image, the username you should use is debian. Therefore, to connect to that VM you should execute the command below. In it, replace 217.71.193.68 with the floating IP address of your virtual machine. Of course, if you need to specify the location of the key used for SSH connection, do it using the -i parameter as usual.
ssh debian@217.71.193.68
As usual, you should receive a question similar to this:

Answer with yes and press Enter. You will be required to change your password immediately:
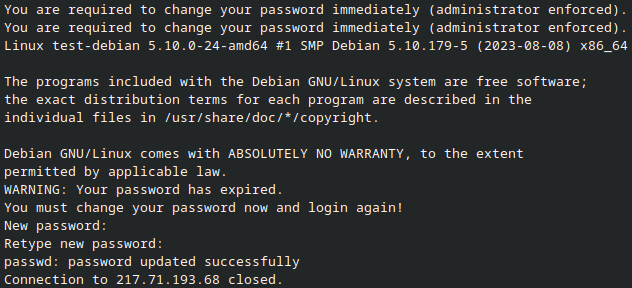
Once you log in properly, with the new password, you should be able to execute the commands on the server.
Other images will have their own default users, so be sure to first learn how to access them in a proper way.