How to create Islet projects on My DataLake Services
The Islet Service is a cloud computing service based on OpenStack that provides users with Infrastructure-as-a-Service (IaaS) solutions. It enables you to
manage and deploy virtualized compute, network and storage resources;
manage virtual resources (e.g. Virtual Machines or Object Storage) with OpenStack Horizon GUI or CLI;
create your own Virtual Machines (VMs) and
use and create Kubernetes clusters.
This article explains how to create and manage Islet projects (OpenStack projects) through My DataLake Services after your islet roles are approved.
What We are Going to Cover
Important
In this documentation, we use the following terms consistently:
My DataLake Services project: the workspace used to manage users, requests, and services.
OpenStack project (also referred to as Islet project in the UI): the tenant in OpenStack where VMs, networks, and volumes exist.
These are related, but they are not the same thing.
Prerequisites
No. 1 Account
You need a profile on My DataLake Services: How to create a profile on My DataLake Services.
You need a valid account with access to the Horizon interface. Currently available are: DEDL CENTRAL, DEDL EUMETSAT, DEDL LUMI, DEDL LEONARDO, DEDL MARENOSTRUM .
No. 2 Administrative privileges within a project
You need to be a member of a project and have administrative privileges in it. That project must be accepted by an operator of My DataLake Services.
To learn how to create a project, check How to create a project on My DataLake Services.
Alternatively, you can join an existing project and its admin can grant you admin privileges.
No. 3 Presence of roles for islet projects
Roles allow you to access different features of Destination Earth cloud. Use article How to request roles for Islet service on My DataLake Services to learn how to submit a request for roles for islet service.
No. 4 Islet documentation
See Islet Service for Islet documentation.
For users and projects in OpenStack, see
Dashboard Overview Project Quotas And Flavors Limits
Projects in My DataLake Services and OpenStack are not the same
This is what the screen for OpenStack quotas typically looks like:
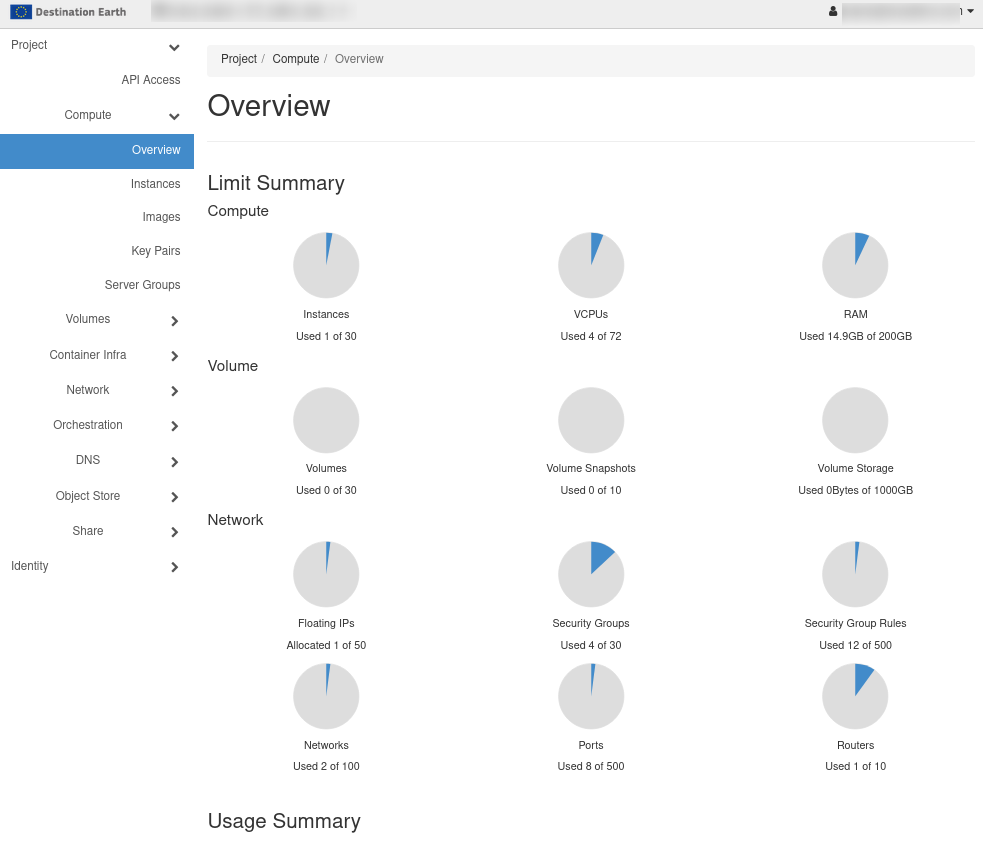
My DataLake Services uses a different UI than Horizon, but both refer to the same OpenStack tenant and quotas. In practice:
The portal is where you submit requests and manage who can access services.
Horizon is where you see the real cloud tenant and its resource usage.
Concept |
Portal (My DataLake Services)` |
Horizon (OpenStack / Islet)`` |
|---|---|---|
Project |
Workspace: members, requests, service access |
Tenant: VMs, networks, volumes |
Where you see it |
Projects |
Identity –> Projects; Compute –> Overview |
Quotas (meaning) |
Requested/approved values used to create/update a tenant |
Enforced limits that cap real usage in the tenant |
Quotas (where applied) |
New project form + operator approval |
Inside the tenant; usage visible in Compute –> Overview |
Common confusion |
“Project exists, but no VMs.” |
“Tenant exists, but quotas are 0 / blocked.” |
How to fix it |
Generate account, then create tenant via Islet projects |
Check Compute –> Overview, request quota update if needed |
In this article:
Projects (My DataLake Services portal) = workspace for people and requests.
Islet projects = OpenStack tenant that Horizon shows under Identity –> Projects.
With that distinction in mind, start in the portal and first ensure your OpenStack user account exists. Then review the available site capacity and create the OpenStack project through Islet projects.
Defining resources in OpenStack vs. My DataLake Service portal
In most OpenStack based clouds, you would create projects directly in Horizon (for example under Identity –> Projects). On DestinE Data Lake (DEDL), however, you must create Horizon projects via My DataLake Services for two reasons:
All requests for resources are subject to operator approval process (when required).
The My DataLake Services portal allows you to manage quotas for different clouds from one place.
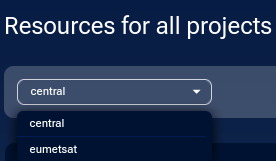
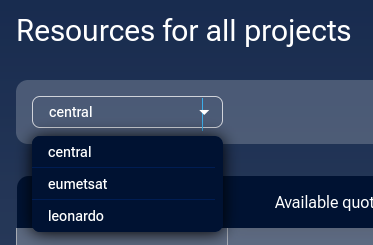
Review the sites on which you can create Islet projects
The number of sites available to create Islet projects on will have been already decided while you were declaring Islet roles for sites (see Prerequisite No. 3 Presence of roles for islet projects). In Islet projects area, open the Resources for all projects drop-down menu and review the currently enabled sites:
Two sites approved |
Three sites approved` |
|---|---|
|
|
If the admin gets approval for additional Islet roles, the number of available sites will, obviously, change.
Review available capacity per site
In the following, we assume that you have got approved for services only on CENTRAL and EUMETSAT. Before creating a new OpenStack project, check
how many OpenStack projects already exist at that site, and
how much quota has already been allocated to them.
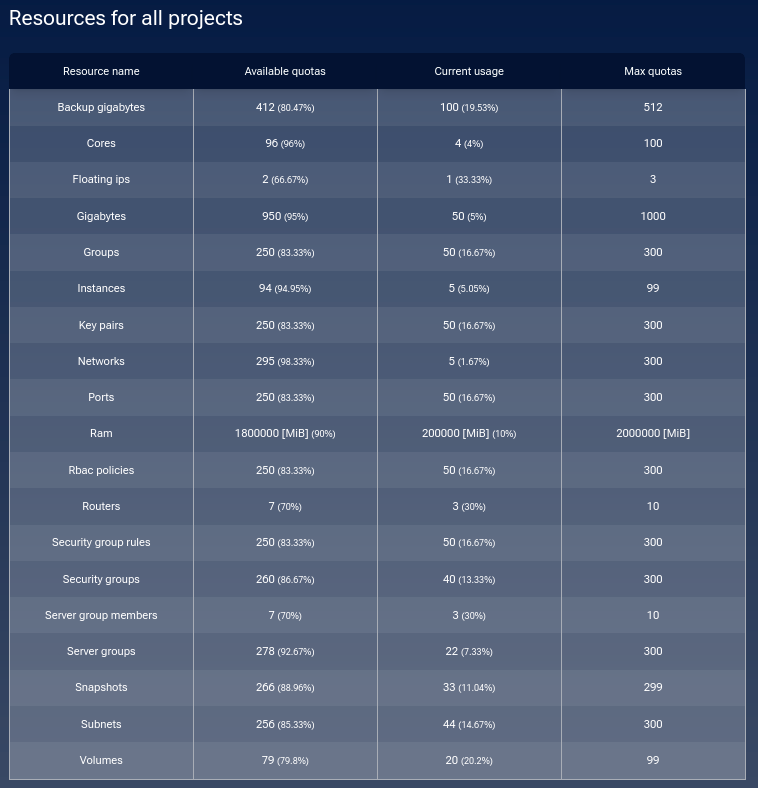
Example view per site:
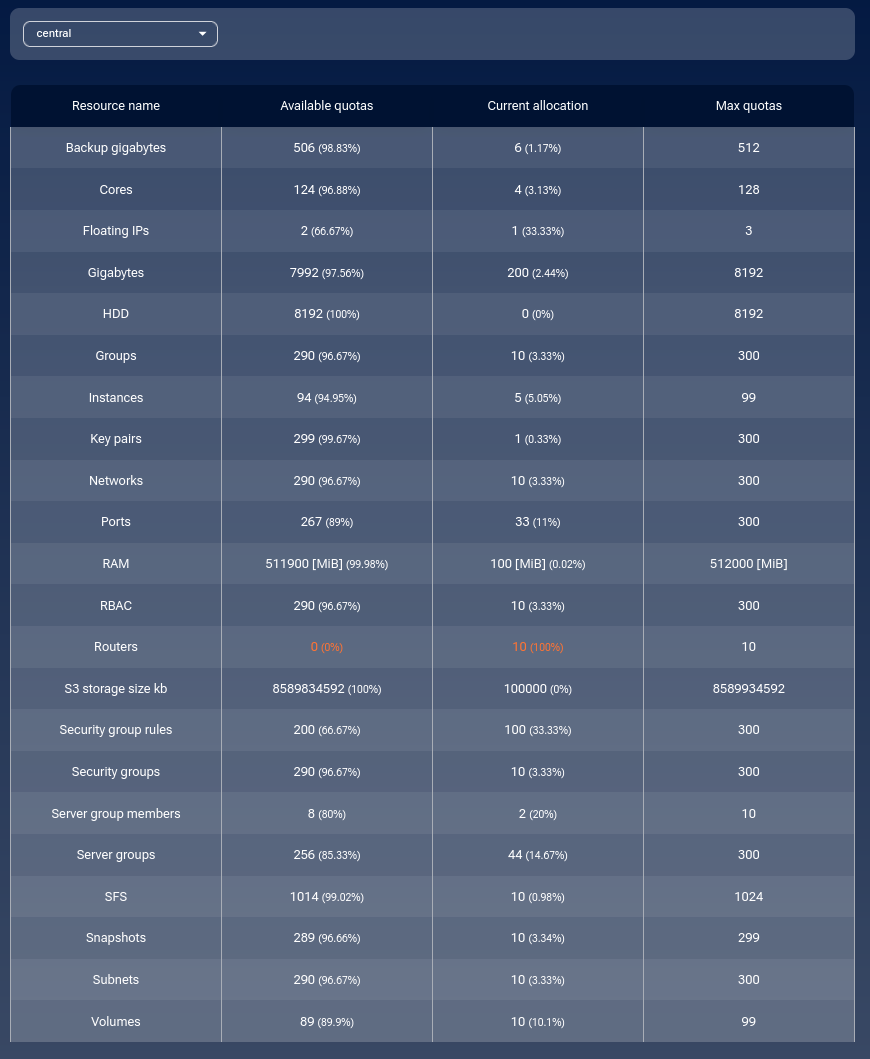
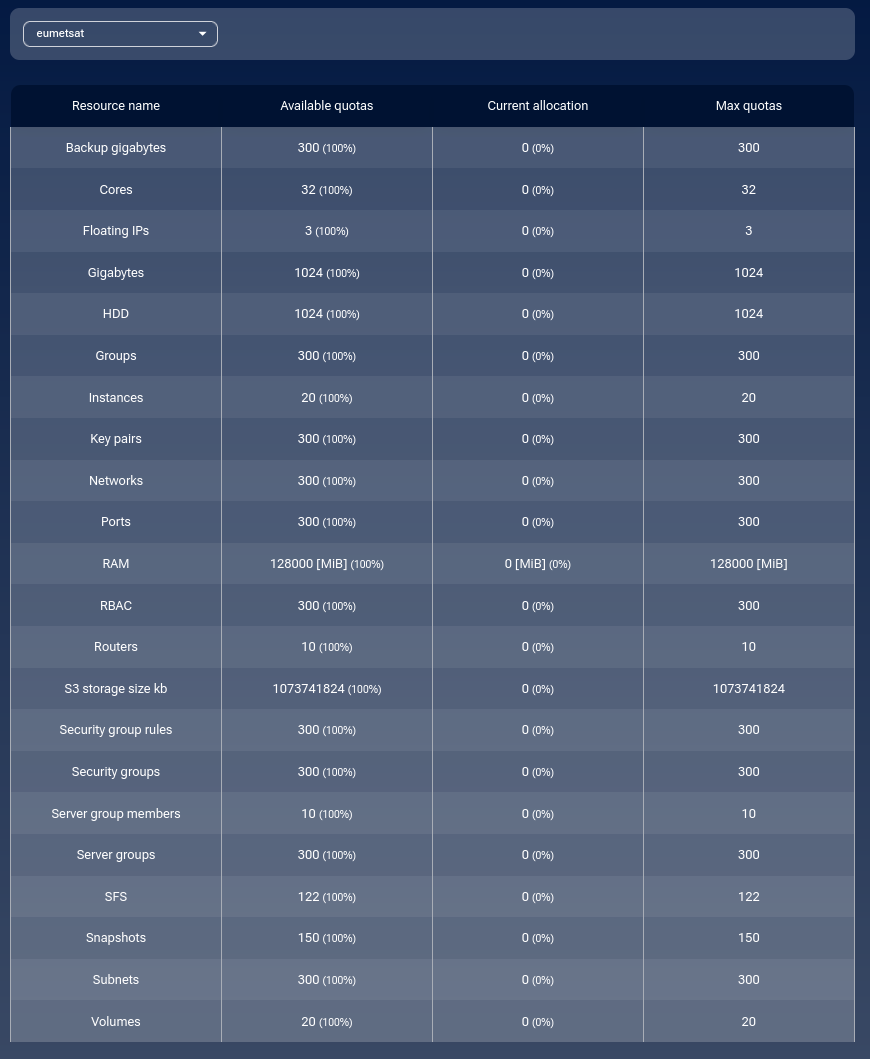
You notice that some resources are assigned to an active project on CENTRAL, while on EUMETSAT there are no projects yet and, consequently, all resources are at their default usage.
Next step: create an OpenStack project from My DataLake Services
Once your OpenStack account exists and you have reviewed site capacity, you are ready to create a new OpenStack project. Click New project to open the project creation form and choose standard or custom quotas in the next section.
Islet projects
After an islet service is approved, a new option in the main menu on the left side will appear, Islet projects, with sub-option, Active projects.
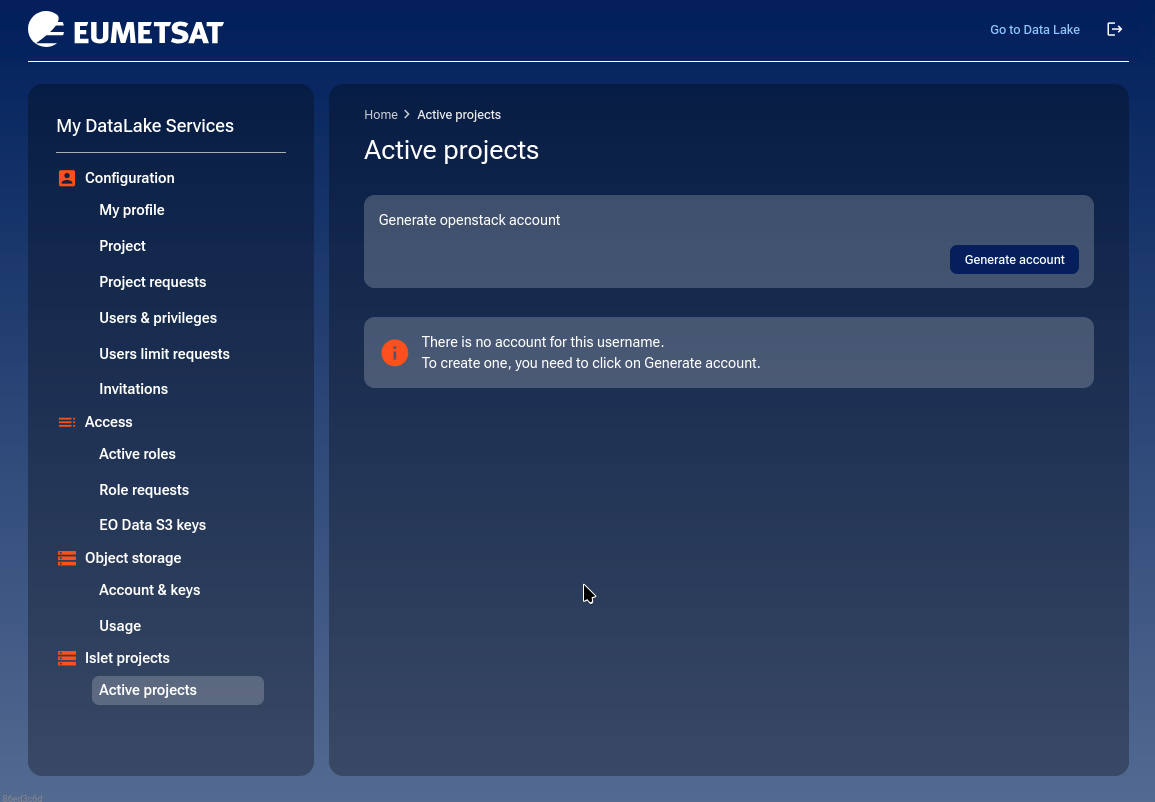
Generate your OpenStack account
My DataLake Services users and OpenStack users are linked, but the OpenStack user may not exist yet.
If you see a message that your account does not have an OpenStack counterpart, click Generate account and confirm the action. A modal confirmation window appears:

If the operation succeeds, a confirmation message appears in the lower-right corner. After that, you can create OpenStack projects and manage quotas.
Note
Generating an OpenStack account does NOT create an OpenStack project. It only creates your OpenStack user identity so you can later create and manage OpenStack projects (Islet projects).
Create new My DataLake Services project
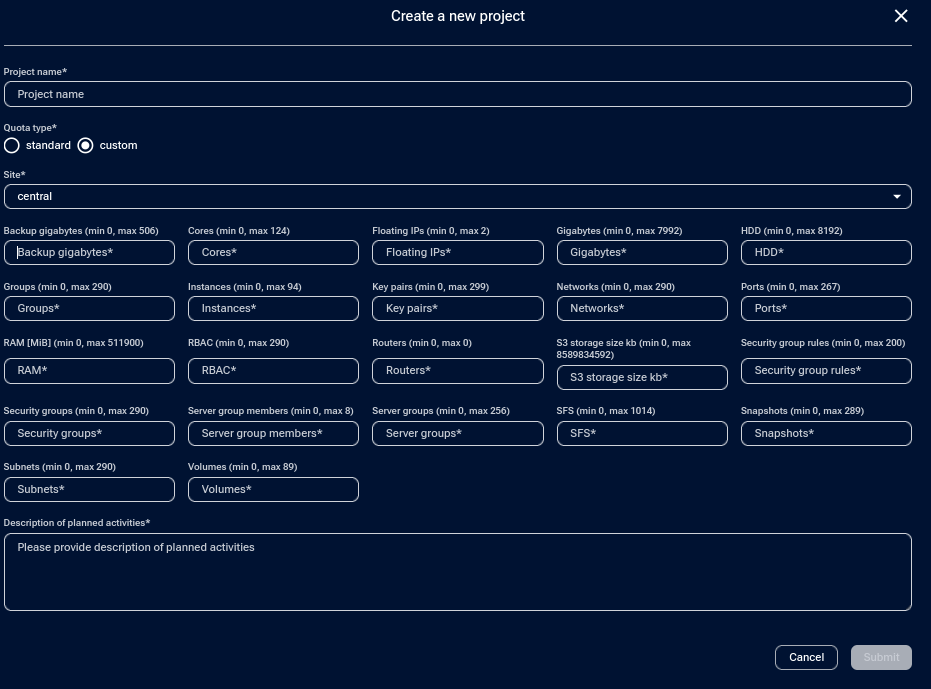
Click the New project button and get the following form:
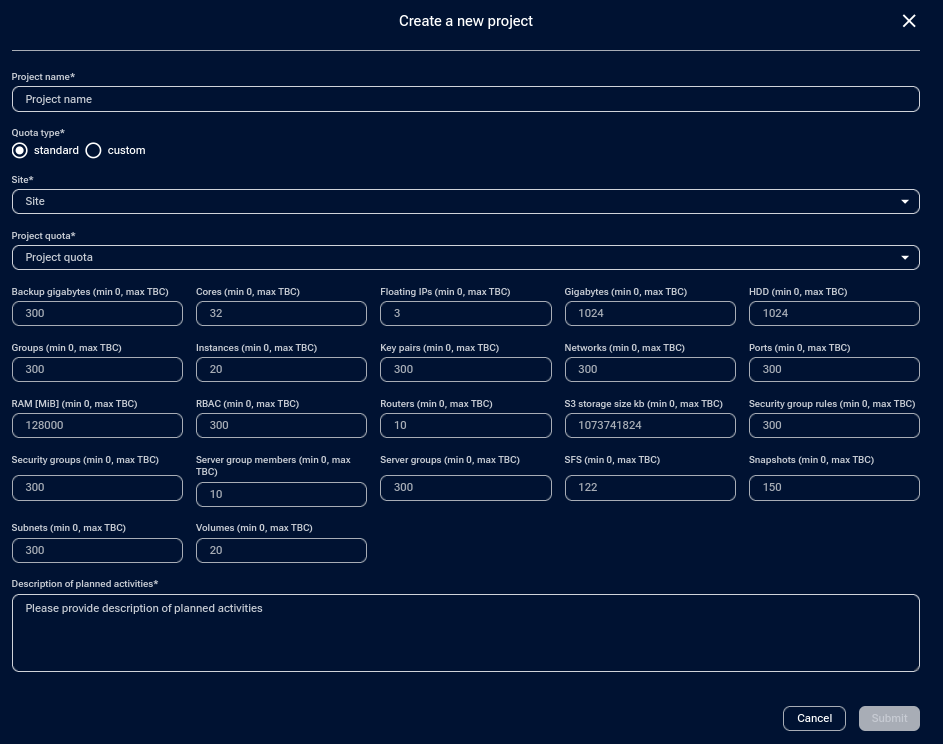
Fields Project name, Quota type, Site, Project quota and Description of planned activities are mandatory.
For the field Site, the only choice is central, regardless of whether you previously chose central or eumetsat in the Resources for all projects window.
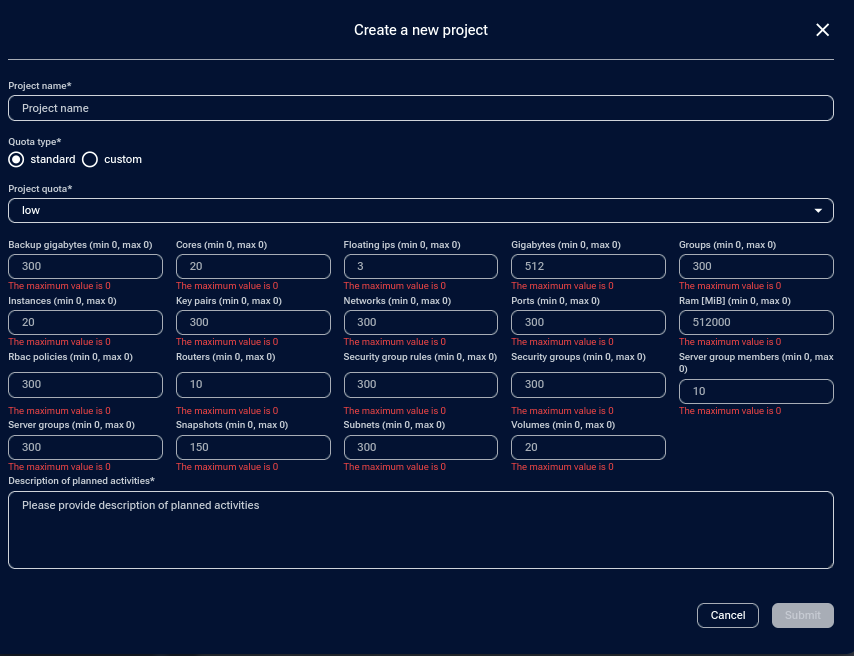
Quota Type
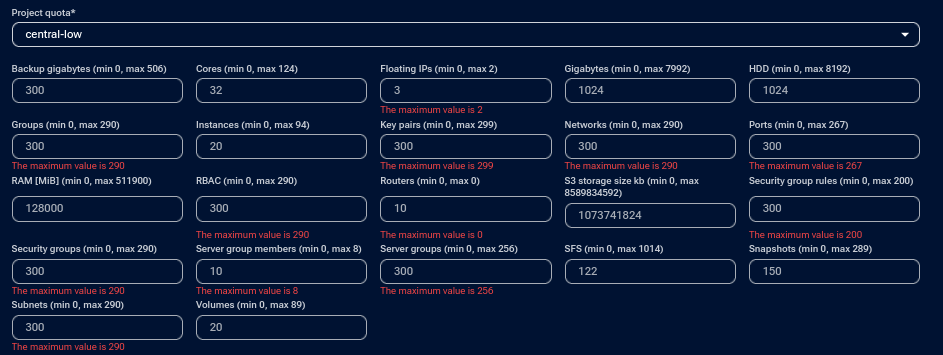
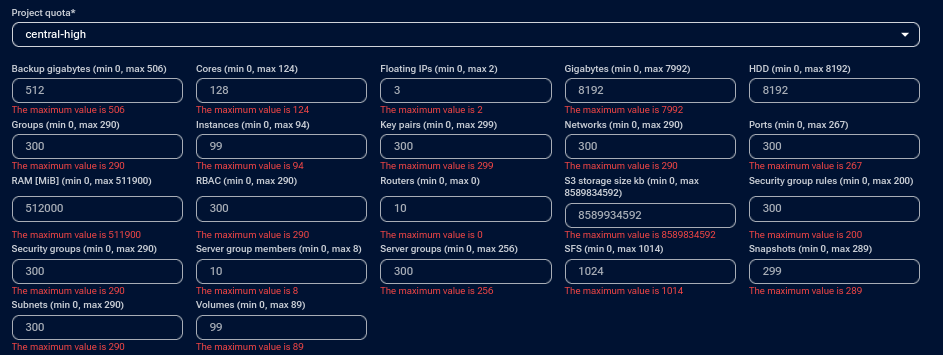
Quota type has two values, standard and custom. If it is standard, you have a drop-down field Project quota to choose from one of three options: low, medium or high. The value of low is the default state and corresponds to the figure above. Choosing value medium, however, produces errors:
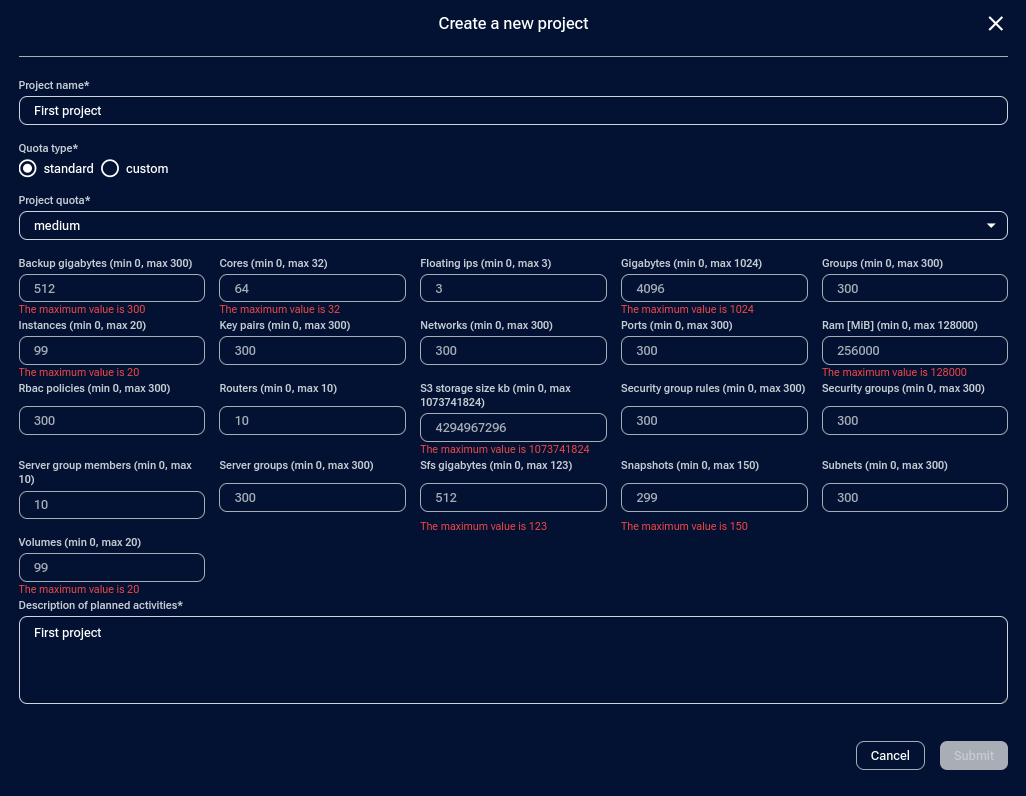
The project quota of medium tries to have 512 gigabytes for backups, however, there is only 300 of those in the system. The values of islet project quota high would be similarly impractical.
Here are the full specifications for central-low, central-medium and central-high.

Note
Rule of thumb
Service quota (for example islet-low, islet-medium, islet-high) controls the overall limits available to you.
Project quota (standard/custom) controls how much of that capacity you allocate to a specific OpenStack project.
Increasing a service quota does not automatically resize an existing OpenStack project. You must submit a quota update for that project.
Create a new project with realistic small custom quotas
If central already contains one project, you may not be able to create another project using the predefined standard quotas (low/medium/high) because some system-wide limits might already be near their maximum. In that situation, choose custom quotas and request a small but practical set of resources for your real workload.
A good “starter” custom project should:
Be large enough for a real proof-of-concept (a few VMs, basic networking, basic storage).
Avoid reserving hundreds of unused objects (networks, key pairs, security groups, etc.).
Leave room for additional projects later (if you plan to have more than one).
Note
Two fields that often confuse users
S3 storage size (kb) is entered in kilobytes (KB) in this form. For reference: 100 GiB = 104857600 KB.
Some environments display Routers with a maximum of 0. If the form shows that routers are not available, leave the field unchanged and rely on the platform’s networking model.
Example: a feasible small central project
This example fits a typical small workload:
1–3 users
3–8 Virtual Machines (or a small Kubernetes cluster)
1 public-facing entry point (bastion / reverse proxy / VPN gateway)
Moderate block storage, limited snapshots, and minimal “object count” quotas
Use the following values when filling in the custom form:
Apply the values in the form
In the Create a new project window:
Set Quota type to custom. This makes the form show realistic currently available ranges for each resource.
Enter the suggested values from the table above. Keep the numbers intentionally small so you can still create additional projects later.
In Description of planned activities, describe your real use case in one or two sentences. For example:
“Small development and testing environment for virtual machines and a small Kubernetes cluster, including one public bastion host and basic storage for datasets and backups.”
Click Submit to create the project request. After submission, the new project will appear with status PENDING until it is reviewed by the operator.
Project request has been submitted
After you submit the request, the new entry appears under Active projects.

Before moving on, it is useful to check two views:
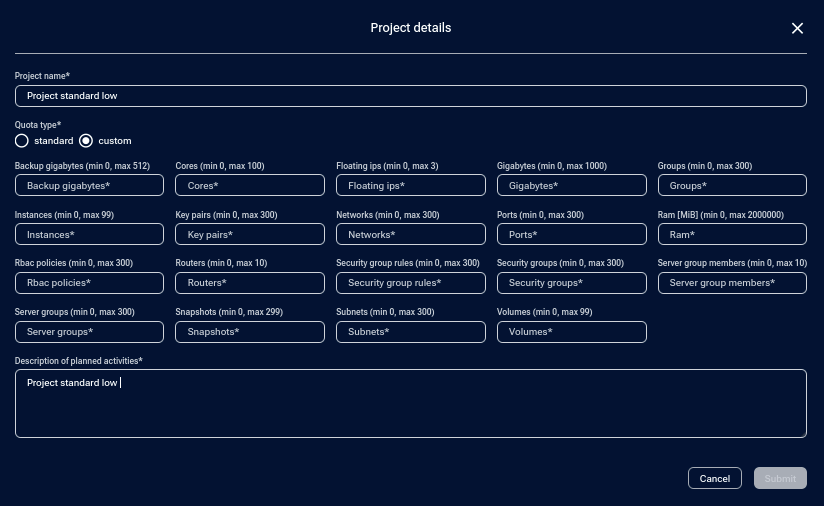
- Details
Shows the exact quotas and parameters requested for the project.
- Users
Shows which users are assigned to the project.
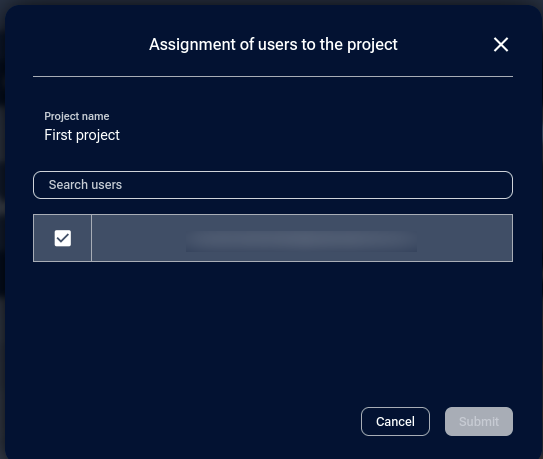
In most cases, the project admin is added automatically as the first member.
If the project status is PENDING, wait for operator approval before continuing with quota verification and creating additional projects.
Tip
If you later discover you need more CPU, RAM, or storage, request a quota update instead of starting with oversized values. This keeps your initial project approval more predictable and avoids exhausting shared system-wide limits.
Managing capacity when creating additional projects
The sections below explain how to verify the first project and what actions are available if you later decide to create additional projects at the same site.
Verify the first project (example)
Once the project request is submitted and appears under Active projects, verify that it is usable before you proceed.
If the project status is PENDING, wait until it becomes ACTIVE (operator approval may be required).
If the project status is ACTIVE, verify the allocated quotas and current usage.
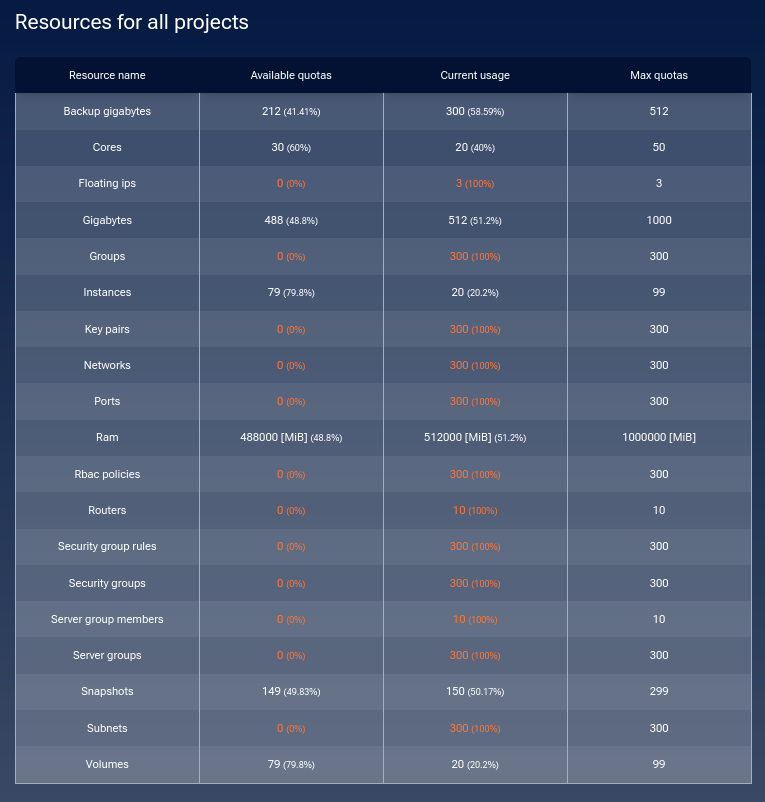
To confirm how much capacity remains at the site, open Resources for all projects and review the Available quotas and Current usage columns:
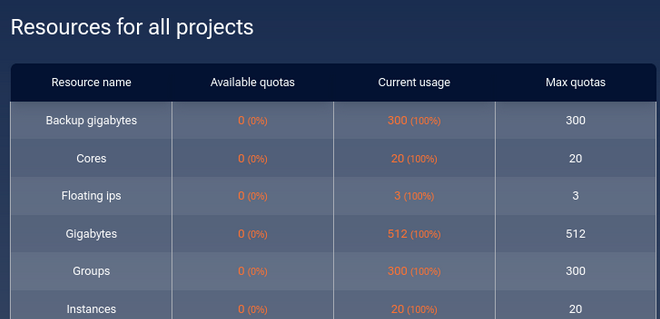
If you see multiple values marked in red (for example Available quotas = 0), it means that the shared site-wide pool for those resources is currently fully allocated. Your project can still be valid and usable, but creating additional projects (especially using standard presets) may be blocked until capacity is freed.
Creating additional projects (optional)
This section is only relevant if you try to create another project and the form blocks your request (for example with red validation messages).
Why standard quota presets may fail
Standard quota presets (for example low, medium, high) assume that enough shared capacity is available at the site. If the shared pool is already close to its maximum for a specific resource (for example backups), the form can reject the request or show validation errors before you can submit it.
In that situation, use custom quotas and request smaller values that fit the remaining available capacity.
Example: validation errors when there is no remaining capacity:
Option A: Adjust quotas of an existing project
If capacity is exhausted, the most reliable approach is to reduce oversized quotas on an existing project and submit a quota update.
To change an existing project, click Details next to its name and set Quota type to custom. Reduce the values that are consuming the shared pool.
Click Submit. The project status becomes QUOTA UPDATE PENDING and later returns to ACTIVE.
Once the Resources for all projects view shows available capacity again for the resources you need, you can create another project using custom quotas.
Option B: Increase service quota (if needed)
If the available limits are too low for your workload, submit a request to increase your service quota (for example from islet-low to islet-medium or islet-high). This may require operator approval.
Increasing the service quota does not automatically resize an existing OpenStack project. You still update each project separately via a quota update request.
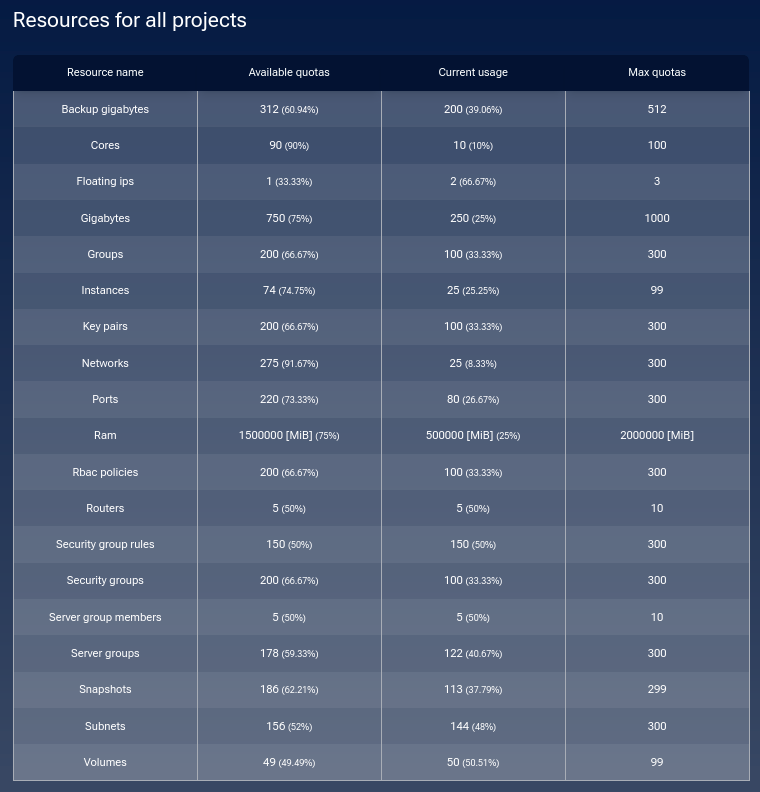
The screenshots below illustrate the site-wide pool before and after the service quota increase. Depending on the site and current allocation, you may see increases for some resources (for example Cores or RAM), while other resources can remain fully allocated.
The following two tabs show the state before and after:
Before: site-wide pool with the current service quota
After: site-wide pool after the service quota increase

Note
A service quota increase improves the overall limits available to you, but it does not guarantee that all resources become available immediately. If specific resources remain at Available quotas = 0, create additional projects using custom quotas and request only what the site can still allocate.
Create an additional project after freeing capacity
After you reduce quotas in an existing project (Option A) and/or receive a higher service quota (Option B), click New project again. The form shows updated maximum values based on what is still available at the site.

Use custom quotas again, taking into account the current available ranges:

After submission, the additional project appears as PENDING and then becomes ACTIVE.
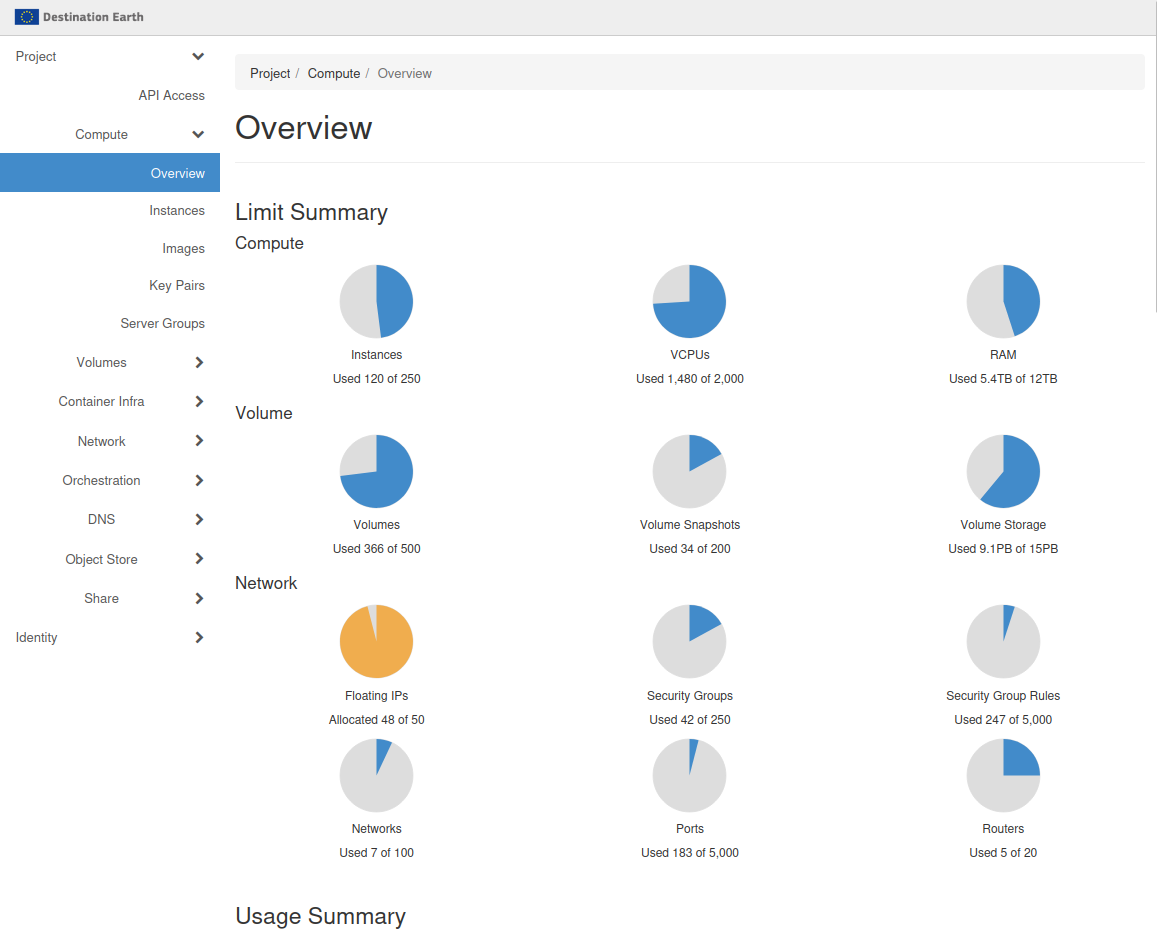
Verify the final OpenStack project quotas in Horizon under Compute –> Overview.
What To Do Next
Verify your new OpenStack project quotas in Horizon: Compute -> Overview. You can now start using the Islet service: Islet service overview.
Also of interest: