Access a MLOps Studio notebook environment with Visual Studio Code Remote Tunnels
A MLOps Studio notebook environment can be accessed from local Visual Studio Code by using Visual Studio Code Remote Tunnels.
This method starts a tunnel inside the notebook environment. You then connect to that tunnel from your local Visual Studio Code installation while the runtime, files, and terminal remain inside MLOps Studio.
Prerequisites
No. 1 Access to the MLOps Studio workspace and dashboard
Begin with access to the MLOps Studio site and namespace where the notebook will run.
Open the workspace by following Access the MLOps Studio workspace.
Once inside, use Use the MLOps Studio dashboard to select the relevant site and namespace.
With the dashboard open in the correct namespace, you are ready to prepare the notebook environment used by the tunnel.
No. 2 Running MLOps Studio notebook with sufficient resources
Remote Tunnels starts Visual Studio Code Server inside the notebook, where it shares CPU and memory with the Jupyter kernel, Python runtime, terminal sessions, package imports, and MLOps Studio tools.
Create and start the environment by following Run Python code in a MLOps Studio notebook environment.
For regular work from local Visual Studio Code, allocate at least 2 CPUs and 4 GB RAM. A smaller notebook with approximately 1 CPU and 2 GB RAM can handle basic commands, short Python snippets, and lightweight notebook work, but it provides limited headroom. Configurations such as 0.5 CPU and 1 GB RAM are not suitable for Visual Studio Code-based notebook workflows and may result in slow response times, reconnects, or interrupted sessions.
The selected notebook image must also provide terminal access, outbound network access, curl, and tar so that it can download and unpack the Visual Studio Code CLI.
Leave the notebook running and confirm that its terminal opens and the required command-line tools are available before starting the tunnel.
No. 3 Visual Studio Code on the local machine
Install Visual Studio Code on the computer from which you will connect.
Use Download Visual Studio Code to obtain the installer for your operating system.
With the application installed, the local editor is ready for the Remote Tunnels extension.
No. 4 Remote - Tunnels extension and sign-in account
The Remote - Tunnels extension enables the local Visual Studio Code window to connect to the tunnel started inside the notebook.
Install it from the Remote - Tunnels extension page.
For an overview of the connection model, consult Developing with Remote Tunnels.
Have the account used for Visual Studio Code Remote Tunnels ready and use the same account type when authorizing the tunnel and connecting from local Visual Studio Code.
No. 5 Jupyter extension for notebook files
Install the Jupyter extension only when you want to open and run notebook files directly in Visual Studio Code.
Obtain the extension from Jupyter extension for Visual Studio Code.
Instructions for working with notebook files are available in Jupyter Notebooks in Visual Studio Code.
After installation, Visual Studio Code is ready to use the existing Jupyter kernel from the running MLOps Studio notebook.
No. 6 Tools and IDE instructions for the optional port-forward method
The alternative port-forward method requires a running Jupyter notebook, kubectl on the local machine, and a working KUBECONFIG file for the target MLOps Studio namespace.
Prepare command-line access with Download and use kubeconfig for a MLOps Studio namespace.
A complete port-forward walkthrough is available in Access a MLOps Studio notebook environment with kubectl port-forward.
Visual Studio Code users can prepare their IDE with Connect to a remote Jupyter server in Visual Studio Code.
PyCharm users can instead follow Configure a Jupyter server in PyCharm.
With kubectl, KUBECONFIG, and the selected IDE ready, you can use the optional port-forward procedure later in this article.
Open the notebook terminal
Open the terminal from the running notebook environment.
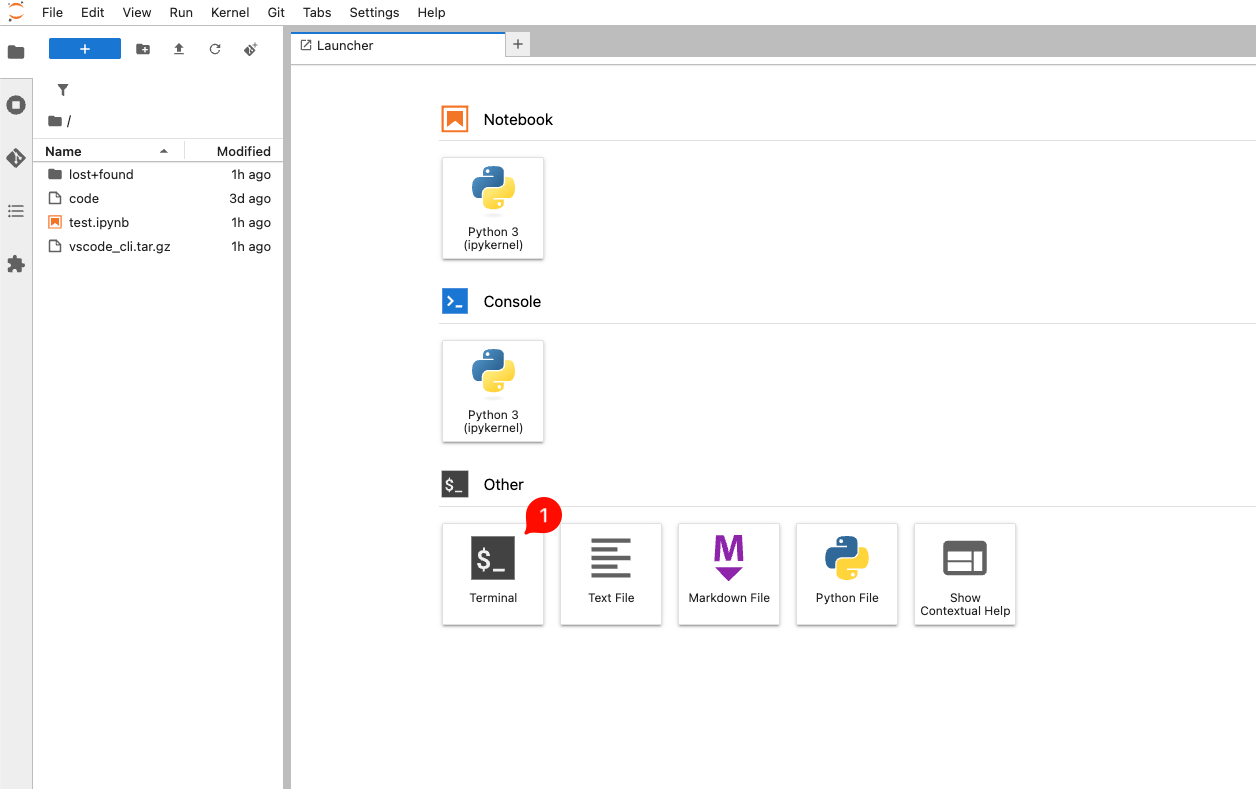
The notebook image must have network access and basic command-line tools such as curl and tar. You can check them with:
which curl
which tar
If these commands are not available in the notebook image, use another notebook image or install the missing tools according to the image policy used in your environment.
Start the Visual Studio Code tunnel
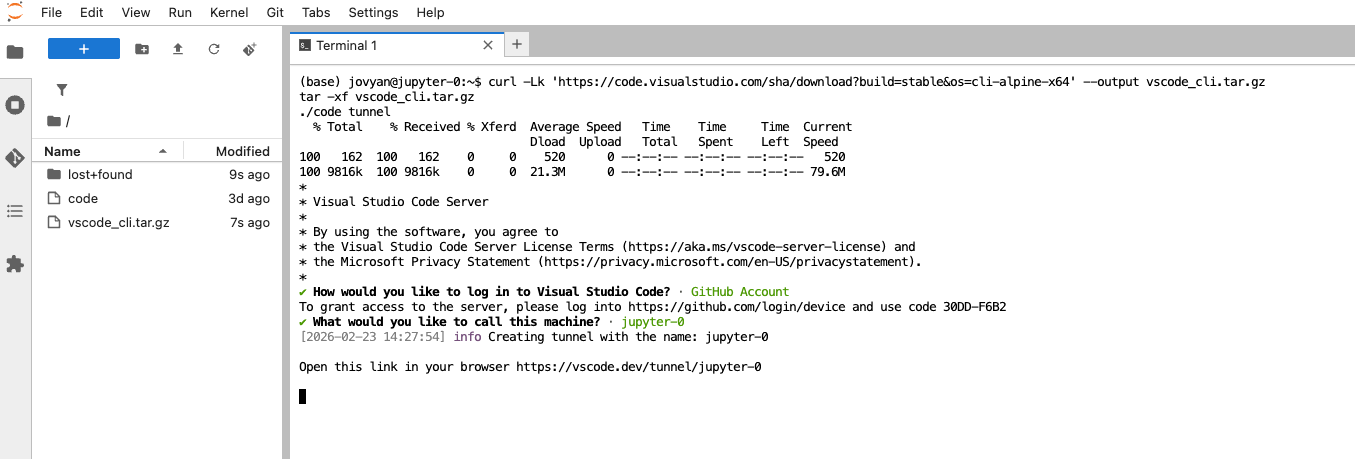
In the notebook terminal, execute the following commands and follow the on-screen instructions:
curl -Lk 'https://code.visualstudio.com/sha/download?build=stable&os=cli-alpine-x64' --output vscode_cli.tar.gz
tar -xf vscode_cli.tar.gz
./code tunnel
The command displays a device login link and a verification code. If prompted for a tunnel name, use a name that helps you recognize the notebook later from local Visual Studio Code. Open the link in a browser, enter the code, and sign in with the account you want to use for Visual Studio Code Remote Tunnels.
Keep this terminal session running while you use the tunnel. If you close the terminal, interrupt the command, or stop the notebook environment, the tunnel is disconnected and local Visual Studio Code can no longer reach the notebook.
A successful execution should result in terminal output similar to the one shown in the screenshot below.
After you finish working and stop the tunnel, you can remove the downloaded archive:
rm -f vscode_cli.tar.gz
Connect from local Visual Studio Code
Open Visual Studio Code on your local machine and choose the remote connection option from the command palette. To open the command palette, press Ctrl+Shift+P.

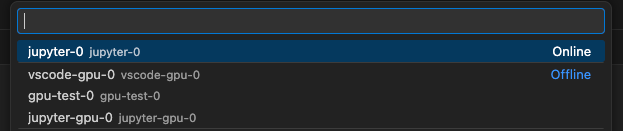
Follow the on-screen instructions. Choose the same account type you used in the notebook terminal, then select your tunnel.
After logging in, you will see the list of available forwarded notebook environments.
Open your working directory
Once you connect to the notebook, open your home directory:
/home/jovyan
You can now work from local Visual Studio Code while the code runs inside the MLOps Studio environment.
Run notebook code from Visual Studio Code
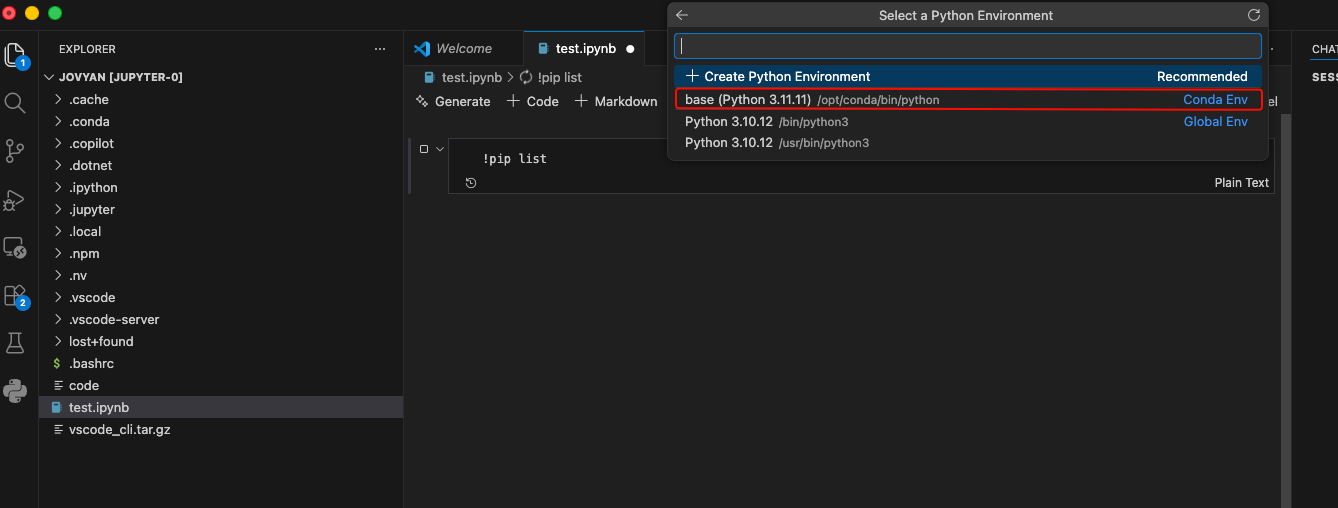
To run a notebook, select Run or Run All, open the kernel picker, and choose an existing Jupyter kernel. Do not select a standalone Python environment, because code executed outside the existing Jupyter kernel does not report activity to the notebook controller.
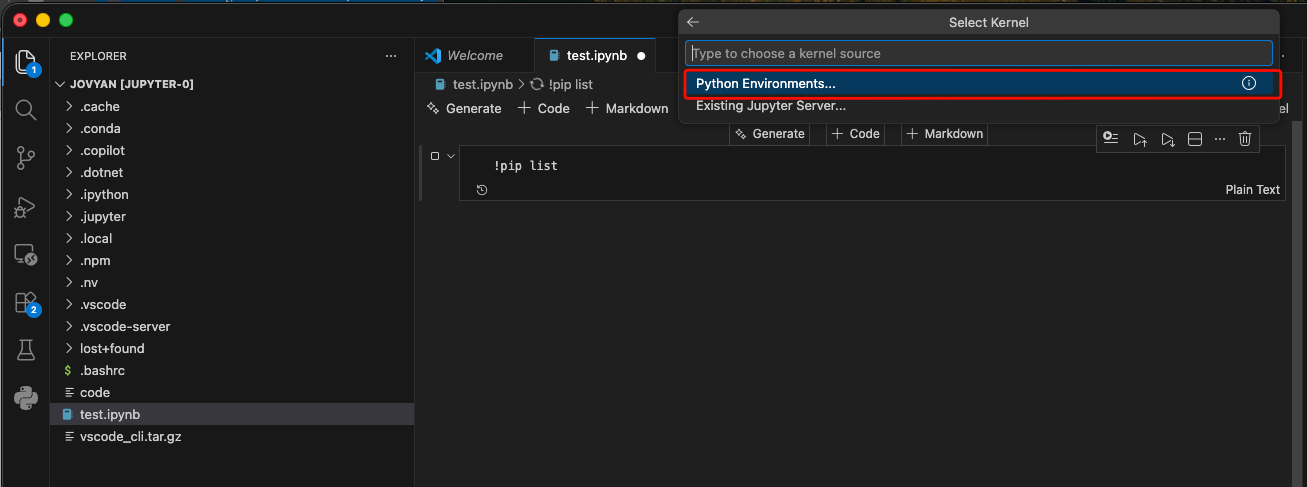
Next, select the existing base Jupyter kernel.
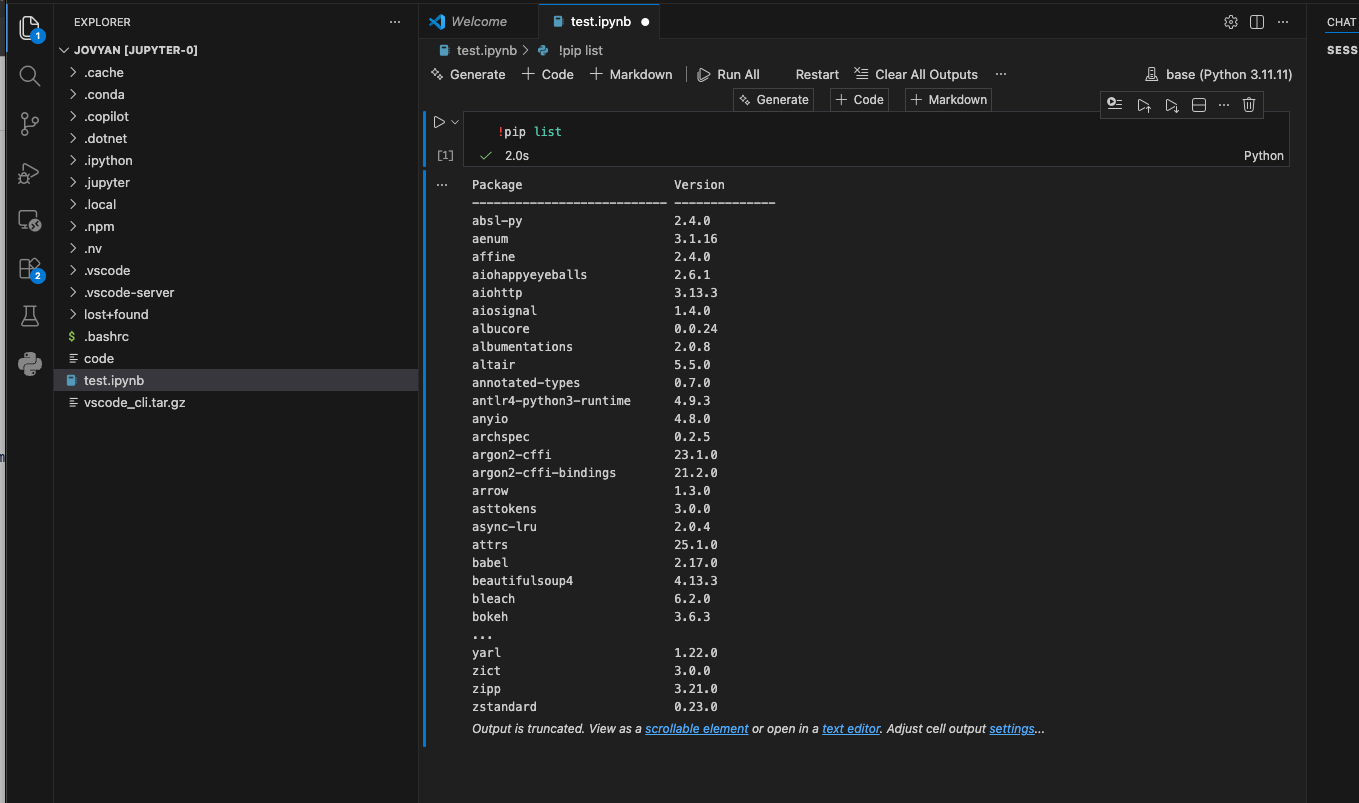
A notebook cell can now be executed from local Visual Studio Code:
Use Visual Studio Code-based notebook environments
The same Remote Tunnels workflow can also be used when the MLOps Studio notebook environment is based on Visual Studio Code.
In this case, you normally work with project files and terminal commands instead of running notebook cells from local Visual Studio Code.
Notebook culling and IDE activity
Warning
The notebook controller uses Jupyter kernel activity and heartbeats to determine whether a notebook is idle. Work started outside the kernel does not send those heartbeats and may be culled by the controller, even while the external process is still running. Running a process with nohup, tmux, or in the background does not prevent this: the process still stops when the notebook pod is culled.
Run package installation and data downloads from a notebook cell or Visual Studio Code interactive window connected to the existing Jupyter kernel, rather than from a separate terminal. Use %pip to install a package into the active kernel environment:
%pip install <package-name>
For data downloads, use Python in a cell or launch the download command from a cell so that the kernel remains busy and reports activity while the download runs:
from pathlib import Path
from urllib.request import urlretrieve

urlretrieve("<download-url>", Path("<destination-file>"))
Alternatively, run an appropriate command from the cell, for example:
!curl --fail --location <download-url> --output <destination-file>
Keep the notebook or interactive window connected until the operation finishes. Starting the same command in a Jupyter terminal, the Visual Studio Code integrated terminal, tmux, or a background process does not create kernel activity and does not protect the notebook from culling.
For workloads that must run outside a Jupyter kernel, use one of these alternatives:
Run the workload as a separate Kubernetes Job, Kubeflow Pipeline, or pod so that it can continue independently of the notebook pod.
Use a scheduled workload for recurring tasks.
If the platform supports it, ask an administrator to increase the idle timeout or exempt the notebook or namespace from idle culling.
Generating artificial Jupyter activity or heartbeats is fragile and is not recommended. For terminal-based or other long-running workloads, a separate Kubernetes Job or Kubeflow Pipeline is the preferred approach.
Stop the tunnel
To stop the tunnel, return to the notebook terminal where ./code tunnel is running and press Ctrl+C.
After the command stops, local Visual Studio Code can no longer reach the notebook through that tunnel.
IDE agnostic way - using kubeconfig and port-forward
Step 1: Start the Port-Forward
Map a local port on your machine to the notebook pod’s internal Jupyter server, which is exposed on port 80 in MLOps Studio.
Run this command and leave the terminal window open. Remember to fill in the placeholders:
kubectl port-forward svc/<your-notebook-pod-name> 8888:80 -n <your-kubeflow-namespace>
Step 2: Construct the Connection URL and use your IDE
Append the specific base path assigned to your notebook using this format:
http://localhost:8888/notebook/<your-namespace>/<your-notebook-name>/
Use the instructions for your selected IDE from Prerequisite No. 6 to connect with this URL.
What to do next
After connecting Visual Studio Code to the running notebook, you can move on to managing the namespace, working in notebook environments, or accessing MLOps Studio components.
Manage namespace membership and resources with Create and manage a MLOps Studio namespace.
For additional notebook workflows, use Run Python code in a MLOps Studio notebook environment.
Access the Pipelines API from another environment by following Access MLOps Studio Pipelines API from outside the cluster.