How to install OpenStackClient for Linux
The OpenStack CLI client allows you to manage OpenStack environments using the command line interface. Its functions include:
Creating, starting, shutting down, shelving, deleting, rebooting virtual machines
Assigning a floating IP to your virtual machine
Listing available resources, including volumes, virtual machines and floating IPs
You can also automate these operations using scripts.
Prerequisites
No. 1 Hosting
You need a Destination Earth hosting account with Horizon interface https://cloud.central.data.destination-earth.eu.
No. 2 Linux installed on your computer
You need to have Linux installed on your local computer or a virtual machine. This article was written for Ubuntu 20.04 LTS and Python 3. Instructions for other Linux distributions might be different.
If you choose a virtual machine, you can run it yourself, or it can be, say, a virtual machine running CENTRAL cloud. If you choose this latter option, the following articles might be of help for you:
What Are We Going To Do
Create a virtual environment and activate it
Install openstackclient
Verify whether installation was successful
Step 1 Create a virtual environment and activate it
Open the terminal of the operating on system on which you wish to install the OpenStack CLI client.
Update the system packages to the latest version:
sudo apt update && sudo apt upgrade
You will now create virtual environment. It allows you to have multiple “instances” of Python with different packages. The OpenStack CLI client will be in one of such environments.
Install latest python client:
sudo apt install python3-dev
Install the package used to create Python virtual environments. If Python is not installed, the command below should pull it as a dependency.
sudo apt install python3-venv
Every Python virtual environment creates a folder which contains a file used to activate it. Navigate to the directory (for example using the cd command) in which you want to have it.
Create a new virtual environment called openstack_cli as follows:
python3 -m venv openstack_cli
Without leaving the previous folder, activate the environment:
source openstack_cli/bin/activate
Important
In the future, each time you start the terminal, if you want to use the OpenStack CLI client, you will need to reenter the appropriate virtual environment as described above.
After that, the prompt will show (openstack_cli) in prefix:

Step 2 Install openstackclient
Before installing the OpenStack CLI client, you should upgrade pip (the package installer for Python) to the latest version, using the command below:
pip install --upgrade pip

Install the python-openstackclient package containing the OpenStack CLI client:
pip install python-openstackclient
This should also install the openstack command which allows you to interact with the OpenStack CLI client.
Step 3 Verify whether installation was successful
The OpenStack CLI client has a built-in help option. You can use this option to check whether the openstack command is operational after installation. To view help, execute the following command:
openstack --help
You should see information regarding using of the OpenStack CLI command. The beginning of this output should look like this:

If this command shows its output using a pager, you should be able use the arrows (or vim keys - letters j and k on your keyboard) to scroll the text and q to exit.
If you are able to read the help of the OpenStack CLI client this way, the installation should be successful.
What To Do Next
By following this article, you have installed the OpenStack CLI client. In order to use this client to perform operations on your Destination Earth cloud environment, you need to authenticate to your account. The following article contains instructions how to do it: How to activate OpenStack CLI access to the cloud
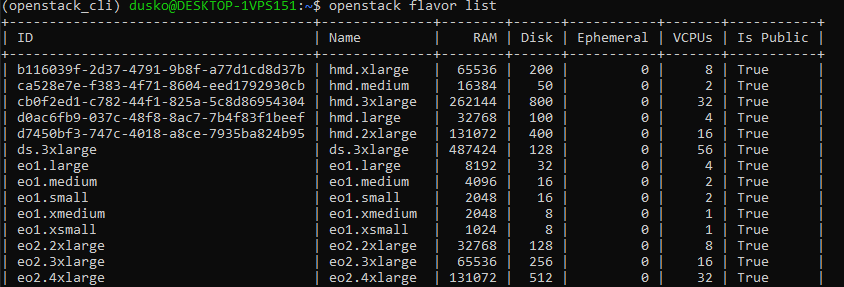
If you successfully authenticate, you will be able to execute commands such as
openstack flavor list
which lists flavor in your project. The output might look like this:

Note that you can also install OpenStack CLI client on Windows. To learn how to do it, check one of the following articles: