Custom Hooks
Table of Contents
Overview
The Hook Service offers pre-built and deployed processors that simplify access and manipulation of data. Additionally, users of Destination Earth Data Lake can create their own custom processors and propose them for deployment on the provided hook service. This serverless and scalable processing, powered by Kubernetes and Argo Workflows, eliminates the need for maintaining your own infrastructure.
The collection of Jupyter Notebooks examples on how to use the DestinE Data Lake services can be found at Destination Earth on Github.
Getting Started
To introduce users to ‘Custom Hooks’ we have a demonstration (
hello-world-processor) We should note that developing your own ‘Custom Hook’ has to follow certain guidelines that impose some limitations on how ‘Argo Workflows’ are implemented. More precisely, only an input path, output path and config file can be specified for the execution of your code (allowing e.g. input files to be available, transformed then output to a folder); when deployed these paths would be mounted from an ‘S3 bucket’ e.g. created on the ‘DEDL Islet Service’The concept is as follows
Copy the project zip file locally to your own environment (This can be your PC or some remote Virtual Machine)
Assure that docker engine is installed (https://docs.docker.com/engine/install/)
eouser@ubuntu:~/projects/hooks/dedl-hello-world-processor$ docker --version
Docker version 24.0.7, build afdd53b
eouser@ubuntu:~/projects/hooks/dedl-hello-world-processor$ docker compose version
Docker Compose version v2.21.0
eouser@ubuntu:~/projects/hooks/dedl-hello-world-processor$
Check the project structure of the hello-world-processor
├── .gitlab-ci.yml                                 # Example gitlab cicd file for building the container automatically and pushing to container registry.
├── Dockerfile                                     # For building the target image where your code will run (e.g. based on python)
├── data                                           # Input/output files are here for local development
│   ├── input_file_location
│   │   └── example.data                           # Demonstration file contains lowercase words
│   └── output
│       └── dedl_hello_world_processor_output
│           └── result.data                        # Demonstration processor just upper-cases words and outputs a file here
├── dedl-hello-world-processor-workflow-pvc.yaml   # Creates persistent volume claim if you want to test on your own Argo Workflows installation
├── dedl-hello-world-processor-workflow.yaml       # Creates the Argo Workflow if you want to test on your own Argo Workflows installation
├── docker-compose.yaml                            # Allows you to build and test your code on your PC/VM
├── processor.py                                   # The main python file (processor) for the demonstration
├── readme.md
├── requirements.txt
- More information can be found in the
readme.md The code for your
Hook(a.k.a. (Argo) Workflow, a.k.a Processor) can be any programming language it is up to you. However, the example we give here is based on python and the container image that is generated is based on python (see Dockerfile)
- More information can be found in the
- The main file is
/processor.py Note that the python file takes 3 parameters (input, output, config_file) that can be used by your processor to execute your own code.
# Extract from processor.py

def main(
    input: Path = typer.Option(...),
    output: Path = typer.Option(...),
    config_file: Path = typer.Option(None),
):
    log.info(
        "processing dedl-hello-world-processor...",
        input=str(input),
        output=str(output),
        config=config_file,
    )
- The main file is
- In our hello-world-processor we will:
take an input file contain some text (called example.txt)
read the lines of the file and convert to uppercase
create an output file in ./dedl_hello_world_processor_output/result.txt
# ##################################
# ##### start custom code      #####
# ##################################

input_file_path = input / "example.txt"

# Convert rows to uppercase
with open(input_file_path, "r") as input_file:
    uppercase_rows = [row.upper() for row in input_file.readlines()]

# ##### output #####

output.mkdir(exist_ok=True)

new_dir = output / "dedl_hello_world_processor_output"
new_dir.mkdir(exist_ok=True)

new_file = new_dir / "result.txt"
new_file.touch(exist_ok=True)

# Open "output_file_path" for writing
with open(new_file, "w") as output_file:
    # Write the uppercase rows to "output_file_path"
    output_file.writelines(uppercase_rows)

# ################################
# ##### end custom code      #####
# ################################

os.system(f"ls -R {input}")
os.system(f"ls -R {output}")
- The Dockerfile is seen here. This will result in a clean python 3.10 based image with the code ready to execute.
python 3.10 base image
folder called ‘app’ created at the root of the image
requirements.txt (i.e. the necessary python libraries for the code to run) copied into /app folder
processor.py copied into /app folder
dependencies installed into image using ‘pip install -r requirements.txt’
FROM python:3.10

RUN mkdir /app
WORKDIR /app
COPY requirements.txt .

COPY processor.py .
RUN pip install -r requirements.txt
- The demonstration docker-compose.yaml file gives us a way of testing the build and execution of our custom code.
an image called ‘dedl-hello-world-processor:latest’ is built (using Dockerfile above)
a volume is mounted so that the ‘data’ folder (in the project) is exposed in the container in the path ‘/mnt/vol’
- The commands are executed as shown below
notably our processor.py file is executed (passing in –input and –output paths)
version: "3.9"
services:
  hello-world-processor:
    image: dedl-hello-world-processor:latest
    build: .
    volumes:
      - ./data:/mnt/vol
    entrypoint: ["/bin/sh", "-c"]
    command:
      - |
        python processor.py --help
        python processor.py --input /mnt/vol/input_file_location/ --output /mnt/vol/output
        #There is an option to pass config file to each proces
        #python processor.py --input /mnt/vol/input_file_location/ --output /mnt/vol/output --config /mnt/vol/configfile
- Now to run our code, we will have to containerise it (i.e. create a docker image containing our code and ready to execute). This will allow us to test the correct execution of our code in its target container.
Creating the container is based on the Dockerfile that is seen in the example folder
- Execute the command “docker compose up –remove-orphans –force-recreate –build”
And you should see that a docker image is created locally and your code executed
eouser@ubuntu:~/projects/hooks/dedl-hello-world-processor$ ls
Dockerfile  data  dedl-hello-world-processor-workflow-pvc.yaml  dedl-hello-world-processor-workflow.yaml  docker-compose.yaml  processor.py  requirements.txt
eouser@ubuntu:~/projects/hooks/dedl-hello-world-processor$ docker compose up --remove-orphans --force-recreate --build
- Here we see when the command is executed
The Dockerfile is used to build an image (here based on python 3.11)
An image dedl-hello-world-processor:latest is created locally in docker (see ‘docker images’)
The processor.py code is executed
You should see a folder is output into the /data/output folder
This allows you to quite simply
developandtestyour processor without having to mount the target image on ‘Argo Workflows’ itself.
[+] Building 29.8s (11/11) FINISHED docker:default => [hello-world-processor internal] load .dockerignore 0.1s => => transferring context: 2B 0.0s => [hello-world-processor internal] load build definition from Dockerfile 0.1s => => transferring dockerfile: 164B 0.0s => [hello-world-processor internal] load metadata for docker.io/library/python:3.10 1.8s => [hello-world-processor 1/6] FROM docker.io/library/python:3.10@sha256:d5b1fbbc00fd3b55620a9314222498bebf09c4bf606425bf464709ed6a79f202 19.9s => => resolve docker.io/library/python:3.10@sha256:d5b1fbbc00fd3b55620a9314222498bebf09c4bf606425bf464709ed6a79f202 0.1s => => sha256:3cb8f9c23302e175d87a827f0a1c376bd59b1f6949bd3bc24ab8da0d669cdfa0 24.05MB / 24.05MB 0.4s => => sha256:af0ef05ce15731d7941a02232a55c6d0125e9156281c7b15821cc5de9f43f49c 2.01kB / 2.01kB 0.0s => => sha256:ea8c96ba521aa08c879a057bce0bbdbc04aeaad085559f540cbb2cca1e9fc55b 7.34kB / 7.34kB 0.0s => => sha256:71215d55680cf0ab2dcc0e1dd65ed76414e3fb0c294249b5b9319a8fa7c398e4 49.55MB / 49.55MB 0.6s => => sha256:5f899db30843f8330d5a40d1acb26bb00e93a9f21bff253f31c20562fa264767 64.14MB / 64.14MB 0.9s => => sha256:d5b1fbbc00fd3b55620a9314222498bebf09c4bf606425bf464709ed6a79f202 1.65kB / 1.65kB 0.0s => => sha256:567db630df8d441ffe43e050ede26996c87e3b33c99f79d4fba0bf6b7ffa0213 211.14MB / 211.14MB 2.9s => => extracting sha256:71215d55680cf0ab2dcc0e1dd65ed76414e3fb0c294249b5b9319a8fa7c398e4 2.6s => => sha256:ea0b25f73cc56581376c04c567670f07365aded3da453cc3183fd5d10969815a 17.15MB / 17.15MB 1.2s => => sha256:d68cd2123173935e339e3feb56980a0aefd7364ad43ca2b9750699e60fbf74c6 6.39MB / 6.39MB 1.1s => => sha256:86f65f8c9197111b2a23136e8b2e6202a7eb246a38343751be39b8ccdcd2e677 245B / 245B 1.4s => => sha256:cd7585faae3375e94b2a07c5b54a0f97e4c867c4deb42180fdc1adda5956a7a9 3.08MB / 3.08MB 1.5s => => extracting sha256:3cb8f9c23302e175d87a827f0a1c376bd59b1f6949bd3bc24ab8da0d669cdfa0 0.9s => => extracting sha256:5f899db30843f8330d5a40d1acb26bb00e93a9f21bff253f31c20562fa264767 3.3s => => extracting sha256:567db630df8d441ffe43e050ede26996c87e3b33c99f79d4fba0bf6b7ffa0213 9.4s => => extracting sha256:d68cd2123173935e339e3feb56980a0aefd7364ad43ca2b9750699e60fbf74c6 0.4s => => extracting sha256:ea0b25f73cc56581376c04c567670f07365aded3da453cc3183fd5d10969815a 0.8s => => extracting sha256:86f65f8c9197111b2a23136e8b2e6202a7eb246a38343751be39b8ccdcd2e677 0.0s => => extracting sha256:cd7585faae3375e94b2a07c5b54a0f97e4c867c4deb42180fdc1adda5956a7a9 0.3s => [hello-world-processor internal] load build context 0.0s => => transferring context: 1.64kB 0.0s => [hello-world-processor 2/6] RUN mkdir /app 3.0s => [hello-world-processor 3/6] WORKDIR /app 0.2s => [hello-world-processor 4/6] COPY requirements.txt . 0.2s => [hello-world-processor 5/6] COPY processor.py . 0.2s => [hello-world-processor 6/6] RUN pip install -r requirements.txt 3.9s => [hello-world-processor] exporting to image 0.4s => => exporting layers 0.4s => => writing image sha256:62dd1ee9bc5eb1cbceff0a4474e159766579d1fce5edea292726263733613306 0.0s => => naming to docker.io/library/dedl-hello-world-processor:latest 0.0s [+] Running 1/1 ✔ Container example-hello-world-processor-1 Created 0.2s Attaching to example-hello-world-processor-1 example-hello-world-processor-1 | Usage: processor.py [OPTIONS] example-hello-world-processor-1 | example-hello-world-processor-1 | Options: example-hello-world-processor-1 | --input PATH [required] example-hello-world-processor-1 | --output PATH [required] example-hello-world-processor-1 | --config-file PATH example-hello-world-processor-1 | --help Show this message and exit. example-hello-world-processor-1 | 2024-03-14 10:47.20 [info ] processing dedl-hello-world-processor... config=None input=/mnt/vol/input_file_location output=/mnt/vol/output example-hello-world-processor-1 | /mnt/vol/input_file_location: example-hello-world-processor-1 | example.txt example-hello-world-processor-1 | /mnt/vol/output: example-hello-world-processor-1 | dedl_hello_world_processor_output example-hello-world-processor-1 | example-hello-world-processor-1 | /mnt/vol/output/dedl_hello_world_processor_output: example-hello-world-processor-1 | result.txt example-hello-world-processor-1 exited with code 0
Installation of your own Argo Workflows instance
To test the generated image of your Custom Hook on a real Argo Workflows installation please follow the instruction on the dedicated page. See Installing and Running Argo Workflows
In summary the steps for the installation of Argo Workflows are as follows:
Create a Kubernetes Cluster (e.g. on the Islet Service)
Create a namespace called
argoApply
argo-rolebinding.yamlin order to get elevated rights in this namespaceargoInstall argo workflows with the following command (note hello-world project validated on
v3.5.3or argo-workflows)- kubectl apply -n argo -f https://github.com/argoproj/argo-workflows/releases/download/v3.5.3/install.yaml
Modify security of your argo installation (kubectl patch deployment…)
To access the argo workflows you could apply the following command to get a public IP
- kubectl -n argo patch service argo-server -p '{"spec": {"type": "LoadBalancer"}}'This could then be optionally proxied behind nginx for example (which could handle https)
Build and Push your Custom Hook to a Private Container Registry
Then to run your Custom Hook:
Connect to the DEDL Harbor Container Registry
- Create a private project which will be used for your repositories/artifacts
In your private project you will be able to create a ‘Robot Account’ dedicated to pushing/pulling images from your private project/repository
- Assure your container image is available on your DEDL Harbor private project/repository
You can push your image to the registry manually using the following method
# 1. Login to the Registry
docker login https://registry.central.data.destination-earth.eu/harbor -u ROBOT_USERNAME -p ROBOT_PASSWORD

# Replace
# 'ROBOT_USERNAME' with your robot account username, and
# 'ROBOT_PASSWORD' with your robot account password.

# 2. Build the Container (cd to folder containing Dockerfile). 2 possibilities

# Option1. After building and testing your hook as described above. There will be an image built in your local docker installation.
docker compose up --remove-orphans --force-recreate --build

# Option2. Use docker build directly
docker build -t dedl-hello-world-processor:latest .

# 3. Tag and Push the Container to the Registry
docker tag dedl-hello-world-processor:latest registry.central.data.destination-earth.eu/eum_jess_private/dedl-hello-world-processor:latest
# This command tags the local Docker image with the registry URL and project name.

docker push registry.central.data.destination-earth.eu/eum_jess_private/dedl-hda-harvest-processor:latest
# This command pushes the tagged image to the Harbor registry.
OR alternatively we see an example .gitlab-ci.yml file that could be used to automatically build your image and push it to Harbor automatically (using the created Robot Account)
# .gitlab-ci.yml

# Define stages
stages:
  - build

# Define job for building and pushing Docker image using Kaniko
build_and_push_image:
  stage: build
  image:
    name: gcr.io/kaniko-project/executor:debug  # Kaniko executor image
    entrypoint: [ "" ]
  variables:
    DOCKER_CONFIG: /kaniko/.docker  # Specify Docker configuration directory
  before_script:
    - mkdir -p /kaniko/.docker  # Create the directory if it doesn't exist
    - export
  script:
    - echo "{\"auths\":{\"registry.central.data.destination-earth.eu\":{\"username\":\"$HARBOR_ROBOT_USERNAME\",\"password\":\"$HARBOR_ROBOT_PASSWORD\"}}}" > /kaniko/.docker/config.json
    - /kaniko/executor --context $CI_PROJECT_DIR --dockerfile $CI_PROJECT_DIR/Dockerfile --destination registry.central.data.destination-earth.eu/eum_jess_private/dedl-hello-world-processor:latest
  only:
    - main  # Build only on changes to the master branch
Run your Custom Hook on your own Argo Workflows Instance
Now that we have an image available in your private container registry, we can configure Argo Workflows with the Robot Account so that it has the rights to pull the image and run it.
- Create a kubernetes secret in your Kubernetes cluster / Argo namespace with the Robot Account
Replace the username and password with your Harbor Robot Account
kubectl create secret docker-registry harborcred \
--docker-server=registry.central.data.destination-earth.eu \
--docker-username='robot$eum_jess_private+myargo_robot_account1' \
--docker-password='<Password_plain_text_from_harbor_robot_account>' --namespace=argo
Create a Persistent Volume Claim (Storage for Kubernetes) so that you can test input and output configuration.
# cd (to root of hello world project)
# Note the name of the pvc that will be referenced in your workflow manifest

├── dedl-hello-world-processor-workflow-pvc.yaml   # Creates persistent volume claim if you want to test on your own Argo Workflows installation

# kubectl apply -f dedl-hello-world-processor-workflow-pvc.yaml
Execute your Custom Hook using the demonstration manifest
- Navigate to your argo instance (using public IP or dnsname if you have positioned it)
Find the file dedl-hello-world-processor-workflow.yaml (at root of dedl-hello-world-processor project)
├── dedl-hello-world-processor-workflow.yaml # Creates the Argo Workflow if you want to test on your own Argo Workflows installation
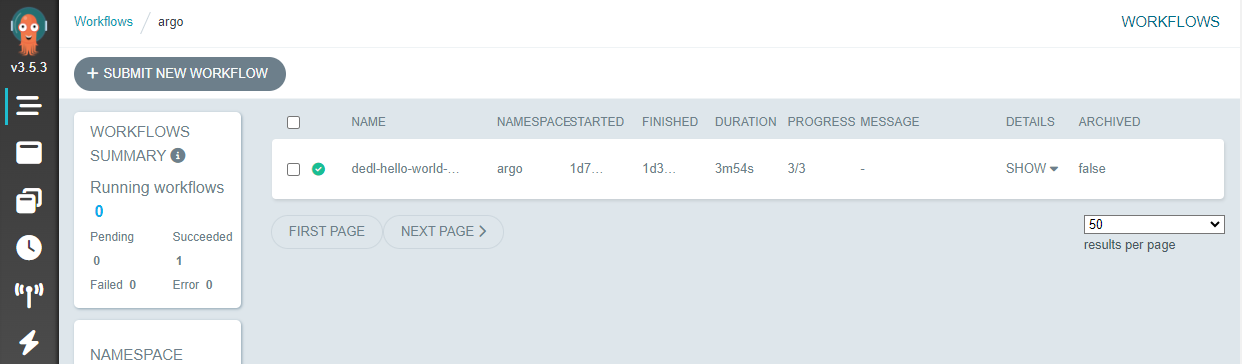
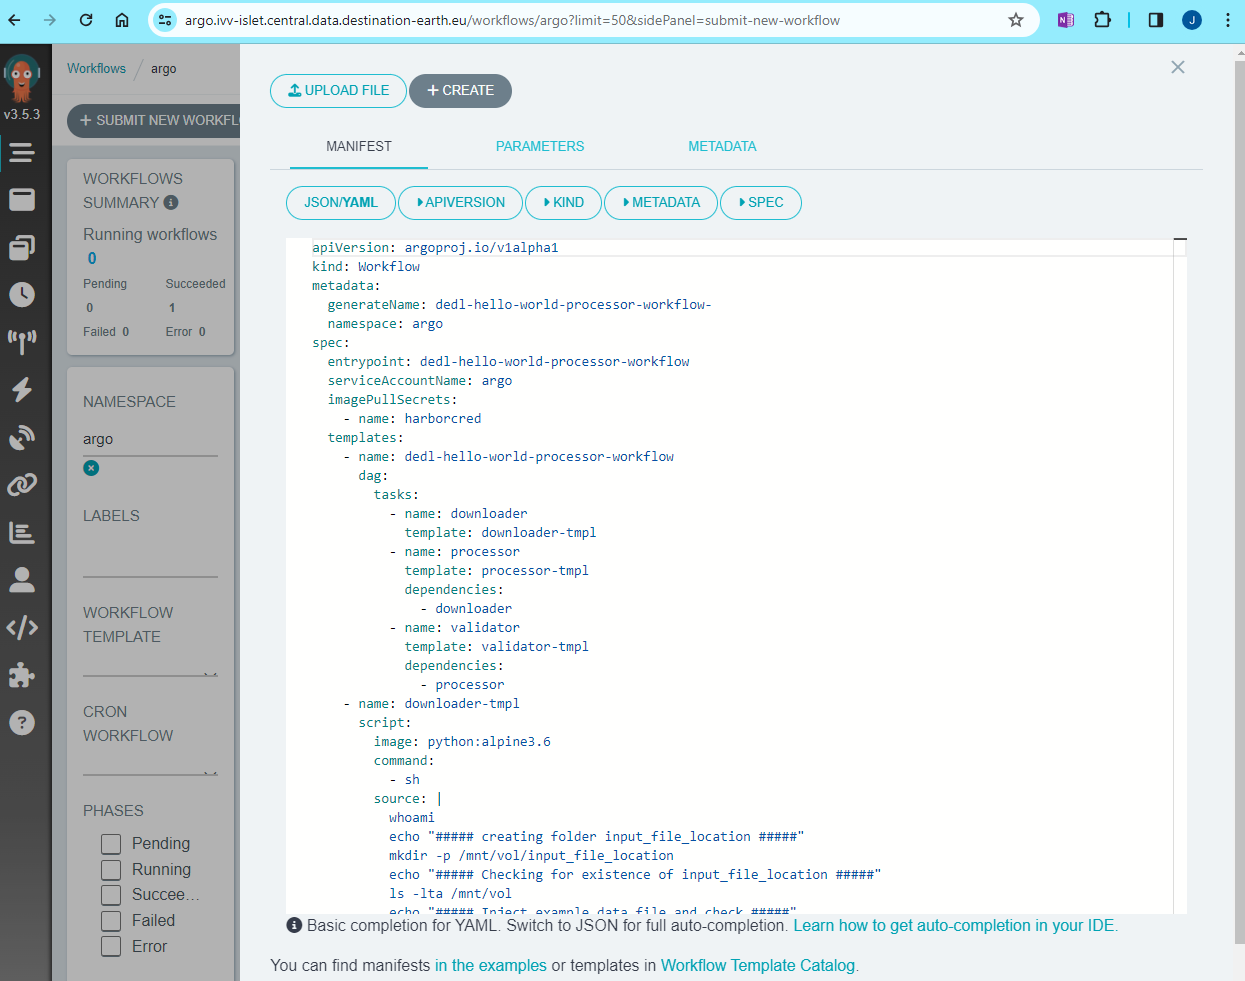
- Click
Submit New Workflowin Argo interface as shown in the screenshot below, then upload or copy the file dedl-hello-world-processor-workflow.yaml
- Click
- Click
Createto start the execution of your ‘Custom Hook’ (a.k.a. Argo Workflow)
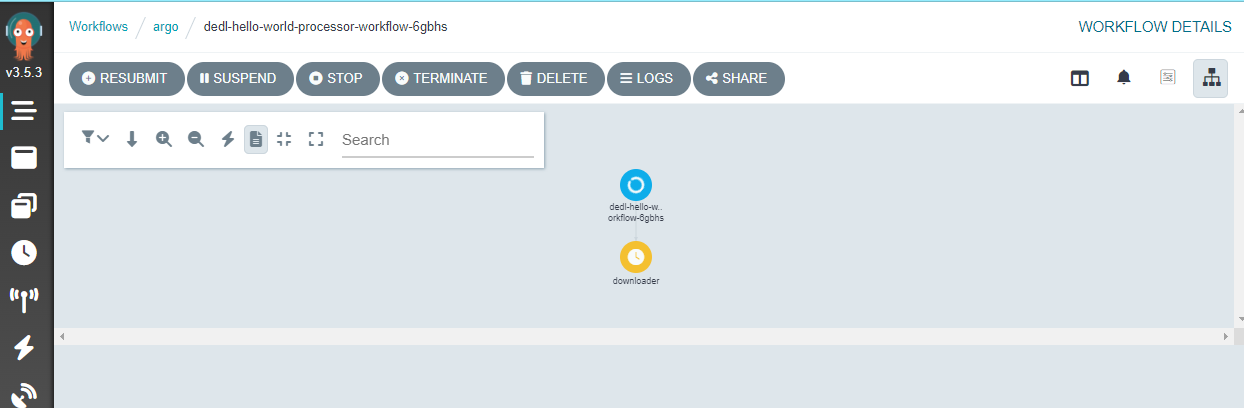
- Click
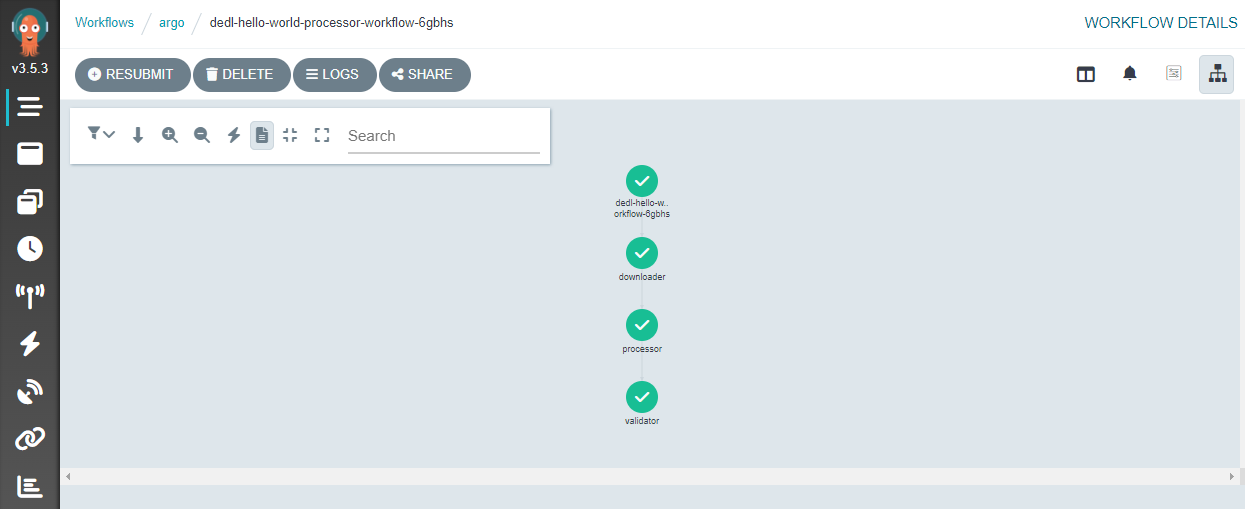
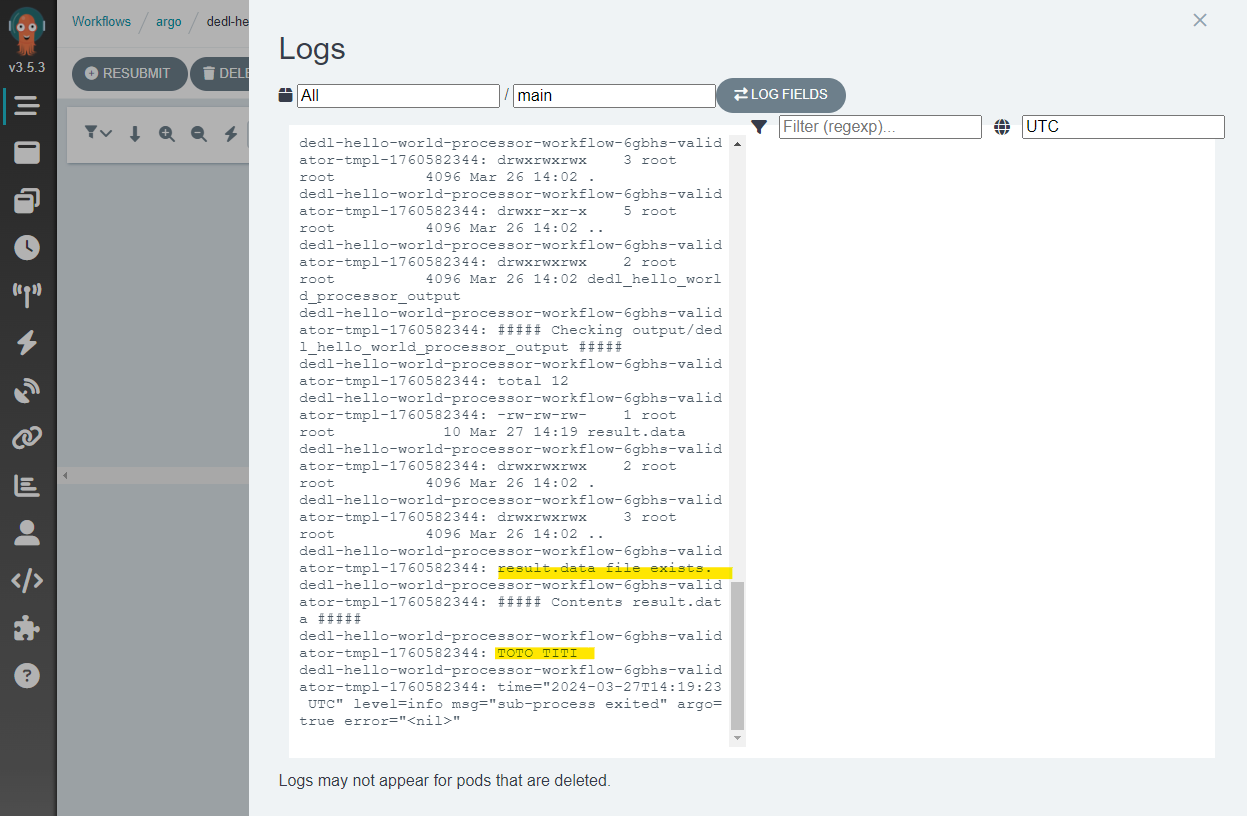
- Wait for the successful execution of your workflow
- Check logs in the interface